
How to run PostgreSQL in Docker and interact with DB
Prompted by a clash with uncooperative PostgreSQL databases, this step-by-step guide was designed to help trainee or junior level developers who just started coding or want to reinforce their knowledge with PostgreSQL.
This is a guide on how to set up a PostgreSQL database using Docker, set up a pgAdmin 4 - feature rich Open Source administration and development platform for PostgreSQL using docker - and interact with the PostgreSQL database using psql - a terminal-based front-end to PostgreSQL.
All of the terminal commands should work in your terminal, provided you have completed the necessary setup steps.
Please note that this guide was made to work on macOs Big Sur v11.6 and requires you to install Docker for macOs beforehand.
Setup PostgreSQL
Pull PostgreSQL docker image
Visit PostgreSQL on hub.dokcer.com page and follow the instructions to pull a PostgreSQL docker image. This can be done with the following command:
docker pull postgres
Command results:
➜  ~ docker pull postgres
Using default tag: latest
latest: Pulling from library/postgres
7d63c13d9b9b: Pull complete
cad0f9d5f5fe: Pull complete
ff74a7a559cb: Pull complete
c43dfd845683: Pull complete
e554331369f5: Pull complete
d25d54a3ac3a: Pull complete
bbc6df00588c: Pull complete
d4deb2e86480: Pull complete
cb59c7cc00aa: Pull complete
80c65de48730: Pull complete
1525521889be: Pull complete
38df9e245e81: Pull complete
380030b85e81: Pull complete
Digest: sha256:eb83331cc518946d8ee1b52e6d9e97d0cdef6195b7bf25323004f2968e91a825
Status: Downloaded newer image for postgres:latest
docker.io/library/postgres:latest
The Postgres docker page contains documentation on image usage.
Run a docker container with PostgreSQL
We can run a docker container using the above pulled (downloaded) image:
docker run --name multiverse -p 5477:5432 -e POSTGRES_DB=c137 -e POSTGRES_USER=rick -e POSTGRES_PASSWORD=plumbus -d postgres
Command results:
➜  ~ docker run --name multiverse -p 5477:5432 -e POSTGRES_DB=c137 -e POSTGRES_USER=rick -e POSTGRES_PASSWORD=plumbus -d postgres
dc5859f3a44778376f357cffb5384a13cbbfaab0648d2446c621abb136a9cacb
➜  ~ docker ps -a
CONTAINER ID   IMAGE      COMMAND                  CREATED          STATUS          PORTS                                       NAMES
dc5859f3a447   postgres   "docker-entrypoint.s…"   31 seconds ago   Up 30 seconds   0.0.0.0:5477->5432/tcp, :::5477->5432/tcp   multiverse
➜  ~ docker images
REPOSITORY   TAG       IMAGE ID       CREATED        SIZE
postgres     latest    d191afba1bb1   22 hours ago   374MB
The container's name is "multiverse", its port is forwarded to "localhost" port "5477".
Three environment variables are passed to the container's startup, "POSTGRES_D", "POSTGRES_USER" and "POSTGRES_PASSWORD".
These mean that the newly created database inside of the docker Postgres container will be called "c137", there will be a user created called "rick" and the connection password will be "plumbus".
The container is run in detached mode, from the image "postgres".
Please note that these "variables" can change: "multiverse", "5477", "c137", "rick" and "plumbus".
Pull a pgAdmin 4 docker image
Visit pgAdmin 4 on hub.dokcer.com for instructions on how to pull and run a pgAdmin4 in a container. In short, to pull the image run:
docker pull dpage/pgadmin4
Command results:
➜  ~ docker pull dpage/pgadmin4
Using default tag: latest
latest: Pulling from dpage/pgadmin4
a0d0a0d46f8b: Pull complete
7e3f7d6e3d66: Pull complete
e9b8e3ed2c63: Pull complete
9e442dd084d6: Pull complete
35bc5a8ecfcd: Pull complete
2ab0e7f79ab2: Pull complete
ea2943343db4: Pull complete
2260de48639f: Pull complete
8a7bd2cec0d6: Pull complete
3df70e78fff9: Pull complete
72ce4104debb: Pull complete
2f4a5f004843: Pull complete
850fb29807a6: Pull complete
acbad1ac363a: Pull complete
Digest: sha256:e8d18f941264a82c6fbe81ce60503f2b00823a36e571cd383ca1f462b578f691
Status: Downloaded newer image for dpage/pgadmin4:latest
docker.io/dpage/pgadmin4:latest
Run a docker container with pgAdmin 4
We can run a pgAdmin 4 image in a docker container:
docker run --name pg_dashboard -p 5488:80 -e [email protected] -e PGADMIN_DEFAULT_PASSWORD=pickleriick -d dpage/pgadmin4
Command results:
➜  ~ docker run --name pg_dashboard -p 5488:80 -e [email protected] -e PGADMIN_DEFAULT_PASSWORD=pickleriick -d dpage/pgadmin4
c2cbda05b39ba43e2da2bbd86e8dec747c28cb808a84afdc88928959c2ee8046
➜  ~ docker ps -a
CONTAINER ID   IMAGE            COMMAND                  CREATED         STATUS         PORTS                                            NAMES
c2cbda05b39b   dpage/pgadmin4   "/entrypoint.sh"         2 seconds ago   Up 2 seconds   443/tcp, 0.0.0.0:5488->80/tcp, :::5488->80/tcp   pg_dashboard
dc5859f3a447   postgres         "docker-entrypoint.s…"   2 minutes ago   Up 2 minutes   0.0.0.0:5477->5432/tcp, :::5477->5432/tcp        multiverse
➜  ~ docker images
REPOSITORY       TAG       IMAGE ID       CREATED        SIZE
postgres         latest    d191afba1bb1   22 hours ago   374MB
dpage/pgadmin4   latest    226cfd7ea23c   6 days ago     259MB
The container's name is "pg_dashboard", its port is forwarded to a "localhost" port "5488".
Two environment variables are passed to the container's startup, "PGADMIN_DEFAULT_EMAIL" and "PGADMIN_DEFAULT_PASSWORD".
These mean that the newly created pgAdmin 4 web interface inside of the docker container will have a default user with email "[email protected]" and a password "pickleriick".
The container is run in detached mode from the image "dpage/pgadmin4".
Open your browser and navigate to http://localhost:5488/ and you should see the pgAdmin 4 web interface:

pgAdmin 4 web interface
Here you can log into the pgAdmin4 using the above "email" and "password":
- "[email protected]"
- "pickleriick"
Which should lead you to the pgAdmin 4 dashboard.
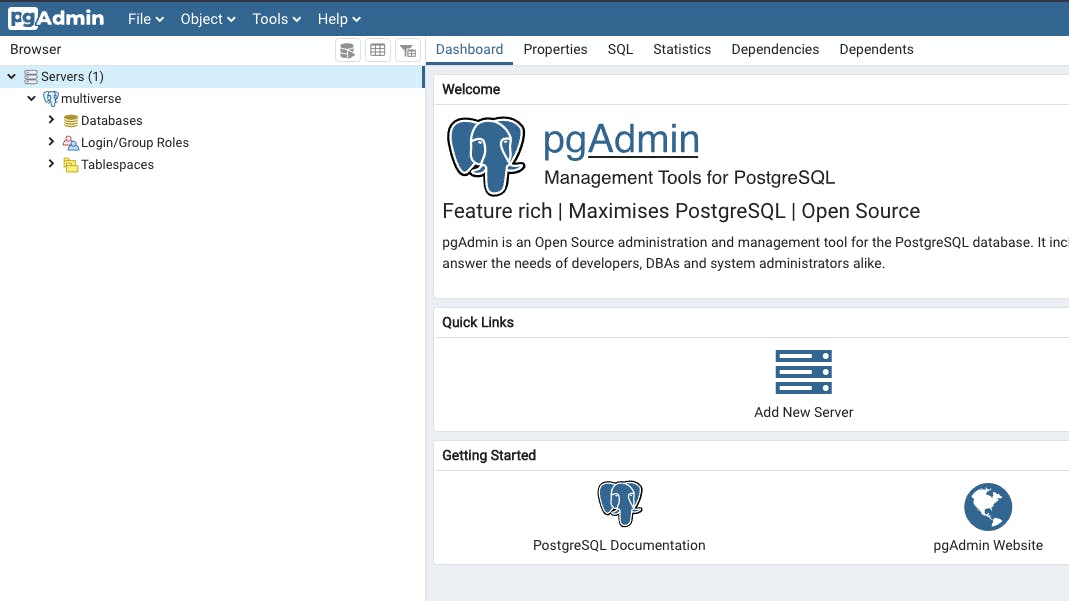
pgAdmin 4 dashboard
Connect to PostgreSQL
Connect to a PostgreSQL DB inside a docker container using pgAdmin 4
To connect to a PostgreSQL DB inside the docker container, create a new server connection.
A window will appear, you can name your server connection any way you want. In this case, we'll name it "multiverse" (same as the docker container running the PostgreSQL instance, not mandatory - you can provide any name you want here).
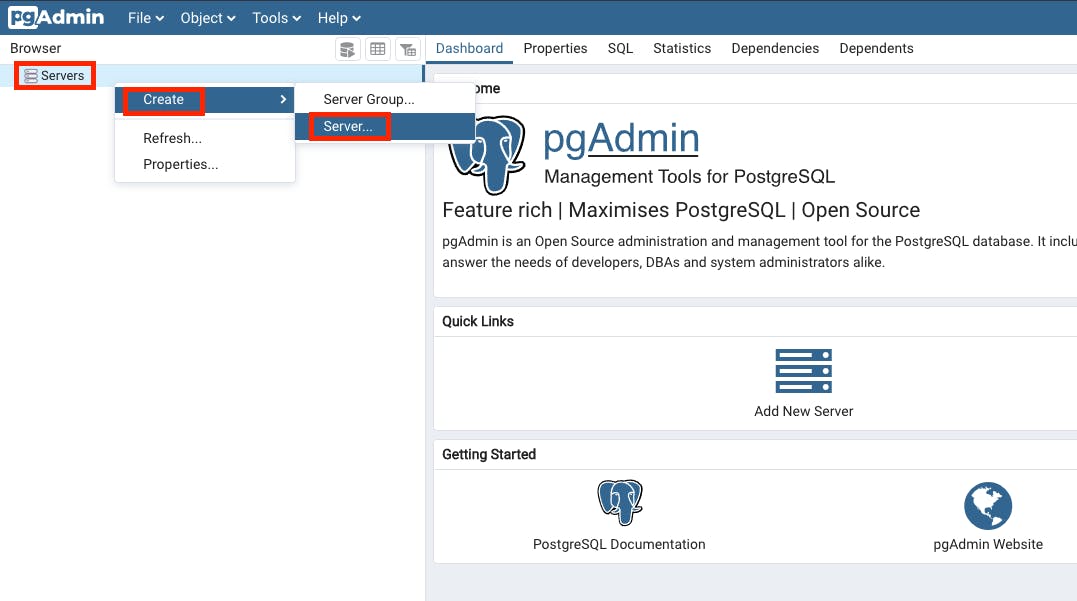
pgAdmin 4 create a new server 1
In the "Connection" tab enter the:
- PostgreSQL host. In this case, it is "docker.for.mac.localhost"
- PostgreSQL port, which is in this case "5477" (port forwarded port)
- database (under maintenance database) "c137"
- username "rick" (postgreSQL username)
- password "plumbus" (user rick's password, for PostgreSQL)
- Tick the "Save password?" box
This last step is not mandatory but it’s best if you do it once and for all.
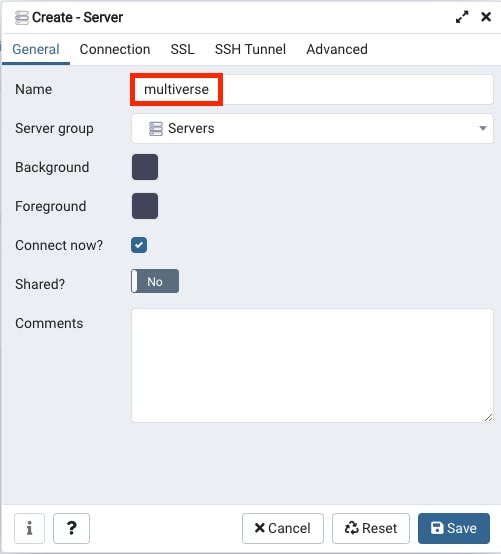
pgAdmin 4 create a new server 2
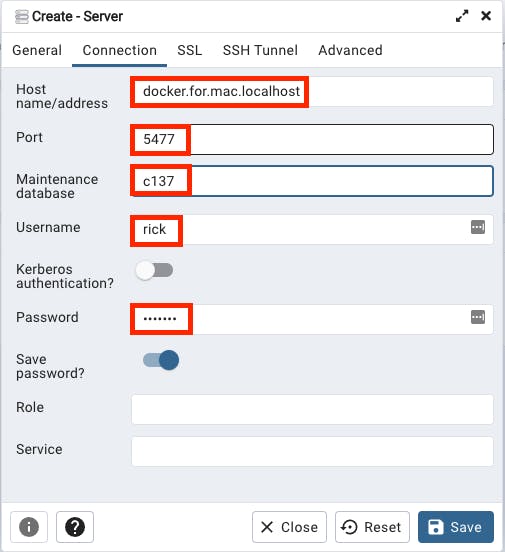
pgAdmin 4 create a new server 3
After clicking the “Save” button, if the connection is successfully established you will see the newly defined server "multiverse" with its "Databases", "Login/Group Roles" and "Tablespaces".

pgAdmin 4 create a new server 4
Tip: Get Postgres container IPAddress (if needed):
➜  ~ docker ps -a
CONTAINER ID   IMAGE            COMMAND                  CREATED              STATUS              PORTS                                            NAMES
c2cbda05b39b   dpage/pgadmin4   "/entrypoint.sh"         About a minute ago   Up About a minute   443/tcp, 0.0.0.0:5488->80/tcp, :::5488->80/tcp   pg_dashboard
dc5859f3a447   postgres         "docker-entrypoint.s…"   4 minutes ago        Up 4 minutes        0.0.0.0:5477->5432/tcp, :::5477->5432/tcp        multiverse
➜  ~ docker inspect dc5859f3a447 | grep IPAddress
            "SecondaryIPAddresses": null,
            "IPAddress": "172.17.0.2",
                    "IPAddress": "172.17.0.2",
Connect to a PostgreSQL inside a remote Kubernetes cluster using pgAdmin 4
Port forward the Postgres container from the Kubernetes cluster.
And in the server connection settings, under host put "host.docker.internal".
Connect to PostgreSQL via psql
Install postgresql using Homebrew (macOS):
brew install postgresql
You can check the PostgreSQL version:
➜  ~ psql --version
psql (PostgreSQL) 13.3
For help run:
psql --help
Connect to a Postgres database using the following syntax:
psql -h host -p port --username="USERNAME" -W -d database
In our case, we need to provide the proper host, user and database:
psql -h localhost -p 5477 --username=rick -W -d c137
Which will connect to the Postgres database "c137" located at "localhost:5477" with username "rick" and you will be prompted to enter the password, which is "plumbus" in this case. If the connection was successful, you should see something like this:
psql - connect to a Postgres DB:
➜  ~ psql -h localhost -p 5477 --username=rick -W -d c137
Password:
psql (13.4)
Type “help” for help.

c137=#
The "c137=#" in front of the cursor means that we are connected to the database "c137".
Useful psql commands
Command
Description
\?
List help
\c
Connect to a database
Ctrl + L
Clear screen in psql
\l
List databases
\dt
Describe all tables
\d table_name
Describe a specific table
\x
Expanded display on / off
\i
Run SQL command(s) from a specified file
\copy
Copy query results to a specified output file (with options)
SQL
We can interact with PostgreSQL databases using SQL commands via psql.
Note that these raw SQL commands can be used inside pgAdmin 4 as well.
All SQL commands must end with a semicolon (";")!
You can split sql commands into multiple lines with "Enter" key in psql, the query will not execute as long as you do not enter a semicolon character (";").
SQL commands can be written all in "uppercase" or "lowercase", it does not matter. Combinations are possible as well. We will use the "uppercase" commands.
You can also run sql commands from a ".sql" file.
Note: Asterix character ("*") in SELECT means every column.
Visit PostgreSQL Data types for more info on available data types in Postgres.
Database
Create a database syntax:
CREATE DATABASE database_name;
Let’s create a database called "test":
CREATE DATABASE test;
Command results:
c137=# CREATE DATABASE test;
CREATE DATABASE
c137=# \l
                             List of databases
   Name    | Owner | Encoding |  Collate   |   Ctype    | Access privileges
-----------+-------+----------+------------+------------+-------------------
 c137      | rick  | UTF8     | en_US.utf8 | en_US.utf8 |
 postgres  | rick  | UTF8     | en_US.utf8 | en_US.utf8 |
 template0 | rick  | UTF8     | en_US.utf8 | en_US.utf8 | =c/rick          +
           |       |          |            |            | rick=CTc/rick
 template1 | rick  | UTF8     | en_US.utf8 | en_US.utf8 | =c/rick          +
           |       |          |            |            | rick=CTc/rick
 test      | rick  | UTF8     | en_US.utf8 | en_US.utf8 |
(5 rows)
Drop a database syntax:
DROP DATABASE database_name;
Now drop the newly created database “test”:
DROP DATABASE test;
Command results:
c137=# DROP DATABASE test;
DROP DATABASE
c137=# \l
                             List of databases
   Name    | Owner | Encoding |  Collate   |   Ctype    | Access privileges
-----------+-------+----------+------------+------------+-------------------
 c137      | rick  | UTF8     | en_US.utf8 | en_US.utf8 |
 postgres  | rick  | UTF8     | en_US.utf8 | en_US.utf8 |
 template0 | rick  | UTF8     | en_US.utf8 | en_US.utf8 | =c/rick          +
           |       |          |            |            | rick=CTc/rick
 template1 | rick  | UTF8     | en_US.utf8 | en_US.utf8 | =c/rick          +
           |       |          |            |            | rick=CTc/rick
(4 rows)
Type "\l" to list all databases. You should see that the database "test" is no longer present.
Note: We already have a database we created during the PostgreSQL docker container creation called "c137", which we will use for the rest of this document, therefore we can drop the "test" database, which was only used to show you how to create and drop databases.
Table
Create a table syntax:
CREATE TABLE table_name (
  Column name + data type + constraints if any,
);
Lets create a table called "alien":
CREATE TABLE alien (
  id INT,
  first_name VARCHAR(100)
);
Command results:
c137=# CREATE TABLE alien (
  id INT,
  first_name VARCHAR(100)
);
CREATE TABLE
c137=# \dt
       List of relations
 Schema | Name  | Type  | Owner
--------+-------+-------+-------
 public | alien | table | rick
(1 row)

c137=# \d alien
                         Table "public.alien"
   Column   |          Type          | Collation | Nullable | Default
------------+------------------------+-----------+----------+---------
 id         | integer                |           |          |
 first_name | character varying(100) |           |          |
After running the command, the "CREATE TABLE" message means that the table was successfully created.
Typing in "\dt" we can list all the tables and see that our "alien" table is present.
Typing "\d alien" we can see that the table "alien" has 2 columns: "id" of type "integer" and "first_name" of type "character varying(100)".
Drop a table syntax:
DROP TABLE table_name;
Drop the table “alien”:
DROP TABLE alien;
Command results:
c137=# DROP TABLE alien;
DROP TABLE
c137=# \dt
Did not find any relations.
c137=# \d alien
Did not find any relation named "alien".
After running the command, a "DROP TABLE" message means that the table was dropped successfully.
Typing in "\dt" we get a "Did not find any relations." message, because no table exists in the database at the moment.
Typing "\d alien" we get a "Did not find any relation named "alien"." message, confirming that our table "alien" no longer exists.
Constraints
Create a table and add constraints to its columns:
CREATE TABLE alien (
  id BIGSERIAL NOT NULL PRIMARY KEY,
  first_name VARCHAR(50) NOT NULL,
  last_name VARCHAR(50) NOT NULL,
  gender VARCHAR(50) NOT NULL,
  date_of_birth DATE NOT NULL,
  email VARCHAR(150),
  species VARCHAR(100)
);
Command results:
c137=# CREATE TABLE alien (
id BIGSERIAL NOT NULL PRIMARY KEY,
first_name VARCHAR(50) NOT NULL,
last_name VARCHAR(50) NOT NULL,
gender VARCHAR(50) NOT NULL,
date_of_birth DATE NOT NULL,
email VARCHAR(150),
species VARCHAR(100)
);
CREATE TABLE
c137=# \d alien
                                       Table "public.alien"
    Column     |          Type          | Collation | Nullable |              Default
---------------+------------------------+-----------+----------+-----------------------------------
 id            | bigint                 |           | not null | nextval('alien_id_seq'::regclass)
 first_name    | character varying(50)  |           | not null |
 last_name     | character varying(50)  |           | not null |
 gender        | character varying(50)  |           | not null |
 date_of_birth | date                   |           | not null |
 email         | character varying(150) |           |          |
 species       | character varying(100) |           |          |
Indexes:
    "alien_pkey" PRIMARY KEY, btree (id)
The constraints here are "NOT NULL" and "PRIMARY KEY" keywords. This basically means that the id is the table "alien"'s primary key and all of the columns that have a "NOT NULL" next to them have a constraint that says these cannot be inserted into the table row empty. More on this later in this article.
Inserting Rows
Insert rows (records, data) into tables syntax:
INSERT INTO table_name (
  column_name
) VALUES (
  column_value
);
Insert a row into the table "alien" without "email" and "species":
INSERT INTO alien (
  first_name,
  last_name,
  gender,
  date_of_birth
) VALUES (
  'John',
  'Doe',
  'Male',
  DATE '1978-05-09'
);
The "INSERT 0 1" message means the insert was successful. Typing "SELECT * FROM alien" gives us all rows from the "alien" table.
SELECT * FROM alien;
Command results:
c137=# INSERT INTO alien (
first_name,
last_name,
gender,
date_of_birth
) VALUES (
'John',
'Doe',
'Male',
DATE '1978-05-09'
);
INSERT 0 1
c137=# SELECT * FROM alien;
 id | first_name | last_name | gender | date_of_birth | email | species
----+------------+-----------+--------+---------------+-------+---------
  1 | John       | Doe       | Male   | 1978-05-09    |       |
(1 row)
Insert a row into the table "alien" with "email" and "species":
INSERT INTO alien (
  first_name,
  last_name,
  gender,
  date_of_birth,
  email,
  species
) VALUES (
  'Summer',
  'Smith',
  'Female',
  DATE '1999-12-02',
  '[email protected]',
  'Human'
);
Note: you can always "DROP" the table and create it again if something goes wrong.
Generate data for tables
For the rest of this article, we will use generated data to create and pre-populate the database tables so that we do not have to re-create the tables and insert data manually if we need a clear start.
It makes it easier to focus on the commands at hand, rather than create and drop tables every time we need a clear, new table with data.
For this purpose, we will use a site called Mockaroo.
Here we can specify our data:
- "Field Name" - which will be our table column name
- "Type" - data type
- "Options" - data options, like how many % (percent) of data will be empty, special date formats, additional formulas for data transformation, etc.
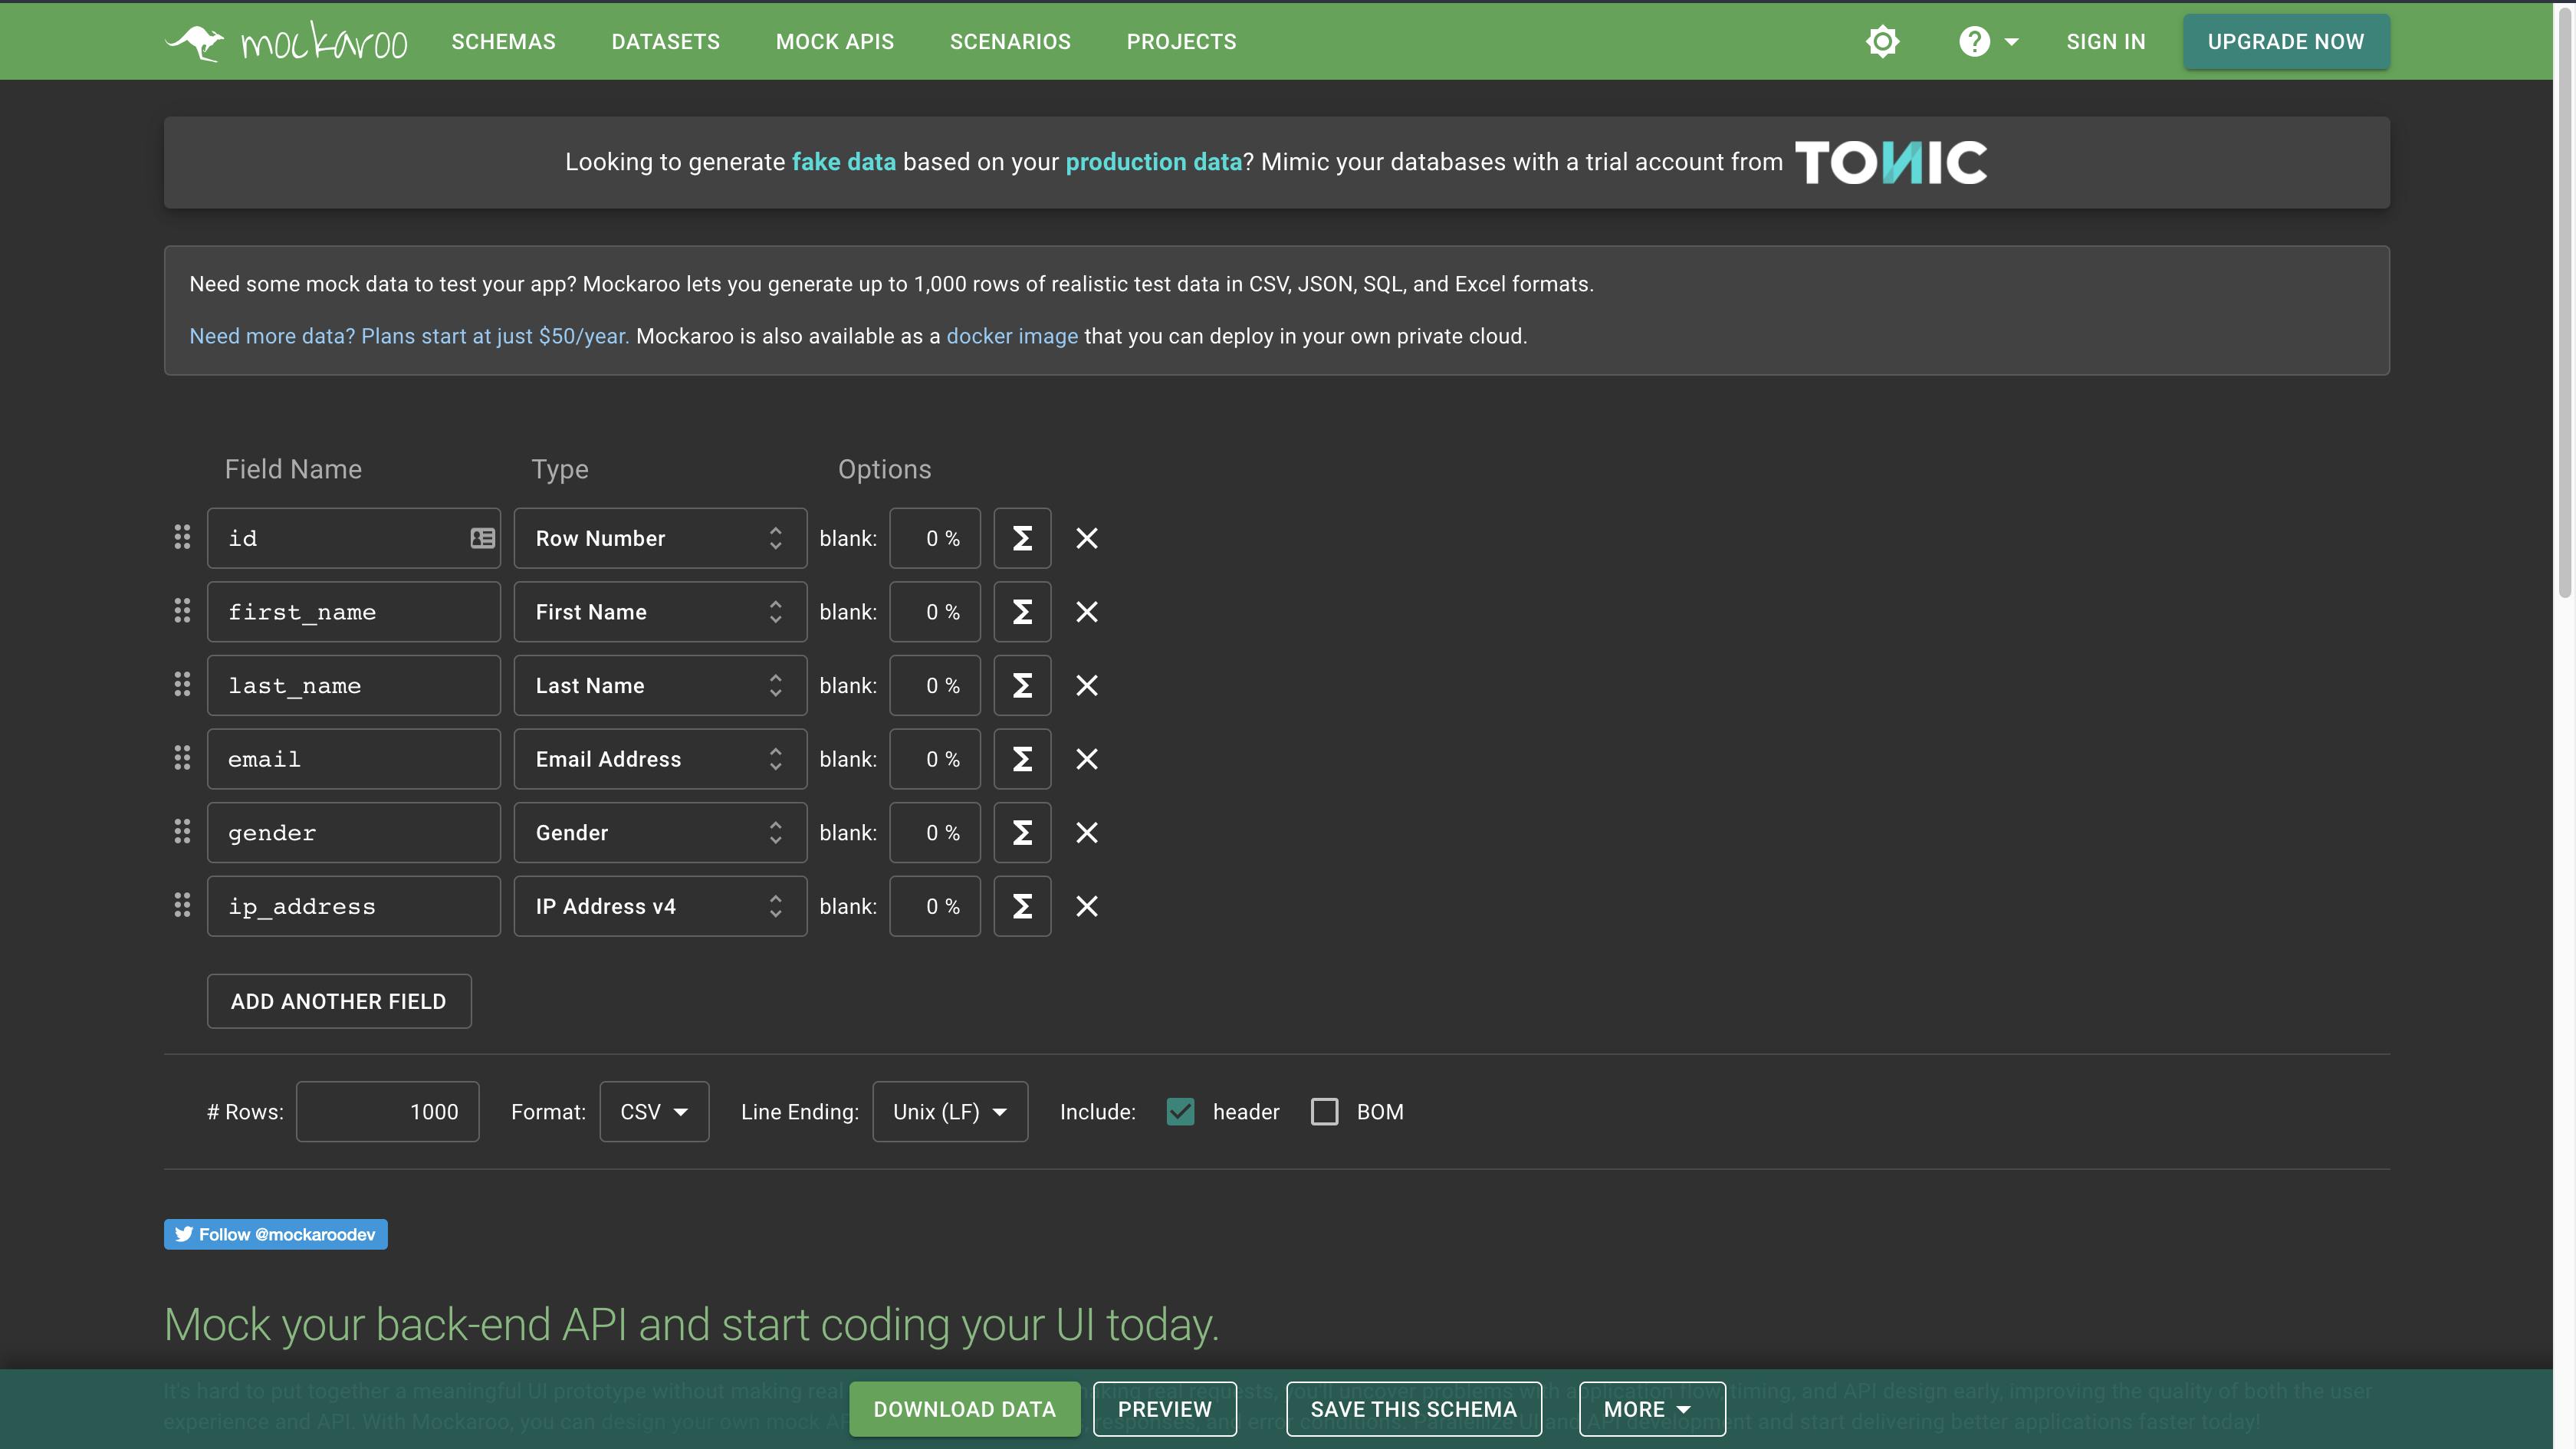
Mockaroo landing page
Generate data for the “alien” table
To generate the data for the "alien" table, fill out the column names and their types according to the "alien" table column definitions.
Using the "ADD ANOTHER FIELD" button, add a few more fields. Name the fields to correspond to column names, and adjust their types if needed.
For "date_of_birth" make sure to select a convenient date range (from 01/01/1905 to 09/28/2021 in this example)
For "email" and "species", add a 30% blank - meaning 30% of the rows will not have this value (column value will be NULL).
Since Mockaroo does not support a "species" data type, select "Custom List" in data types and add some alien species by yourself!
Make sure that you want to generate 1000 rows, select format "SQL", name the table "alien" and tick the "include CREATE TABLE" box. At the bottom of the webpage you should see a "Preview" button. When you click it, you should see the data in sql format, with the "CREATE TABLE" command at the top and "insert" commands at the bottom.
By clicking "download data", your browser should download a file called "alien.sql".
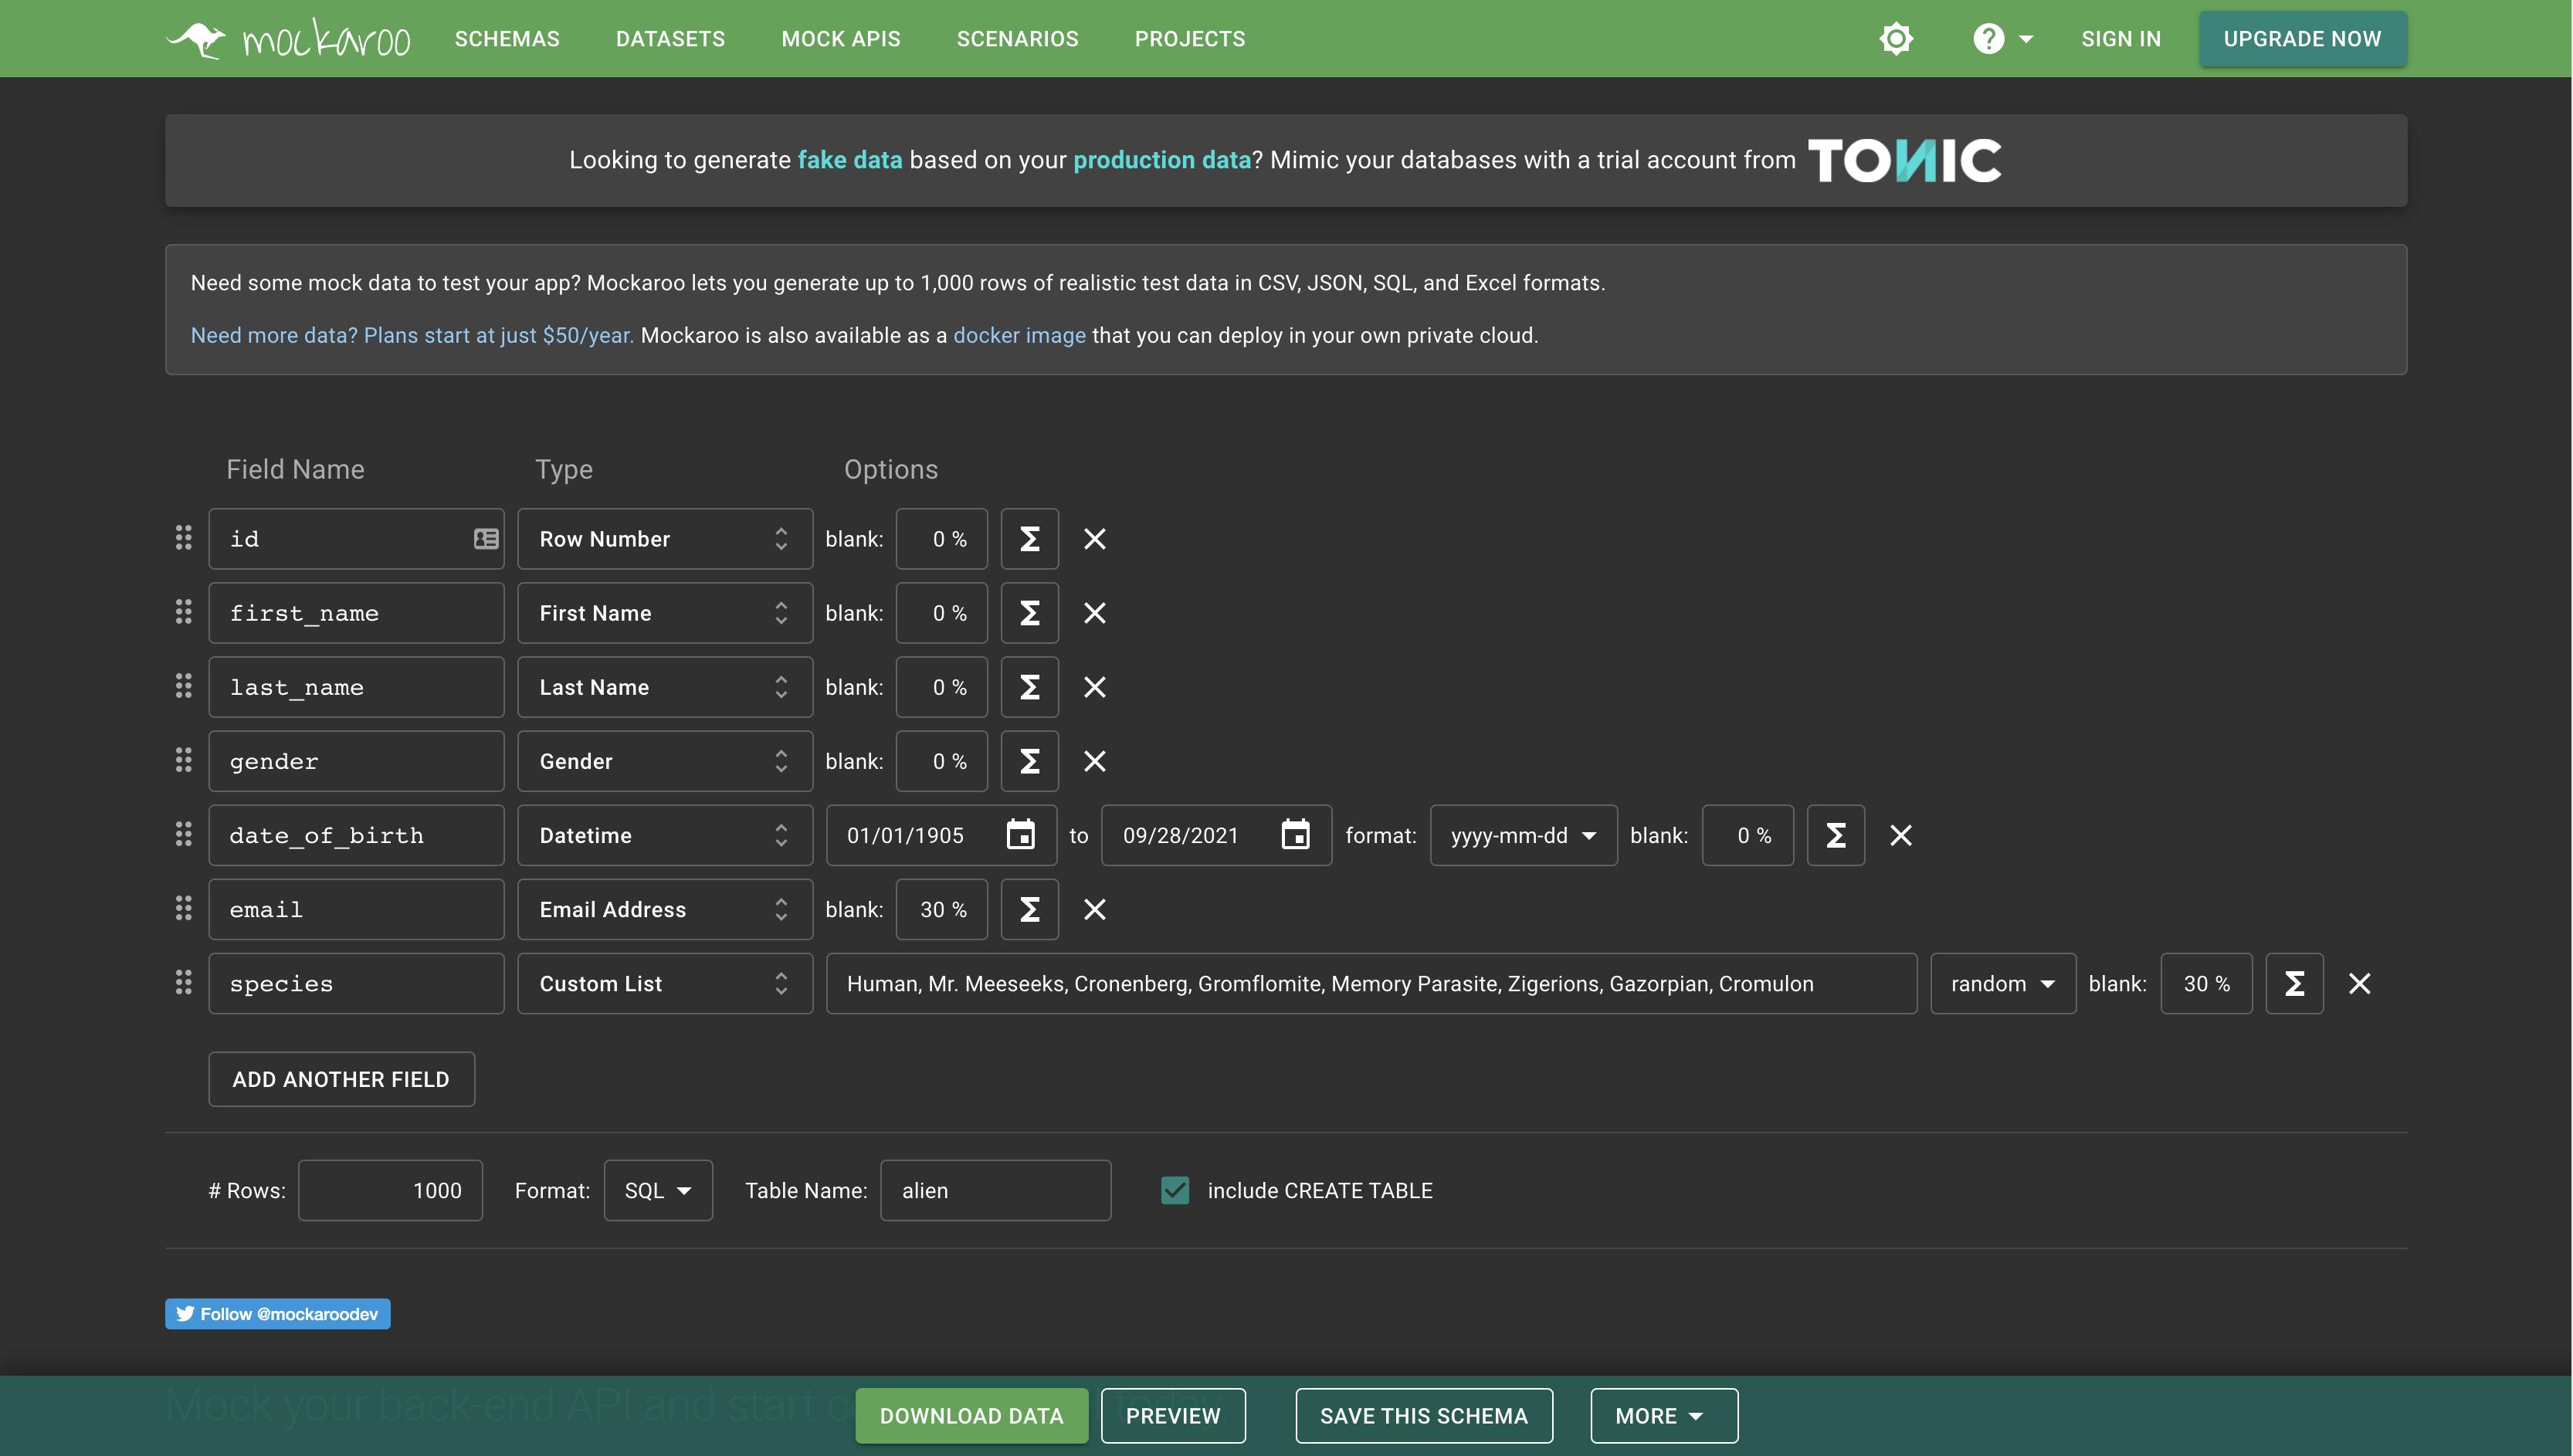
Important: For the purposes of this exercise, edit the downloaded alien.sql file’s “CREATE TABLE” command to look like this:
CREATE TABLE alien (
    id                      BIGSERIAL           NOT NULL PRIMARY KEY,
    first_name              VARCHAR(50)     NOT NULL,
    last_name               VARCHAR(50)     NOT NULL,
    gender                  VARCHAR(50)     NOT NULL,
    date_of_birth       DATE                NOT NULL,
    email                   VARCHAR(50),
    species                 VARCHAR(15)
);
We also need to remove the “id” column and its values from the insert - since we are using a BIGSERIAL data type for our id (these are automatically generated). Here is an example of how an insert command would look like (remember, the SQL commands can be in uppercase or lowercase, or both!).
INSERT INTO alien (
  first_name,
  last_name,
  gender,
  date_of_birth,
  email,
  species
) VALUES (
  'Edita',
  'Quinnell',
  'Agender',
  '1996-12-31',
  '[email protected]',
  'Cronenberg'
);
You can edit and re-use this file to create a fresh “alien” table, populated with data whenever needed.
Generate data for the “car” table
To generate the data for the "car" table, fill out the column names and their types according to the "car" table.
Remove excess fields. Create "id", "make", "model" and "price" columns.
Select 1000 rows, format "SQL", name the table "car" and tick the "include CREATE TABLE" box.
By clicking "download data", your browser should download a file called "car.sql".
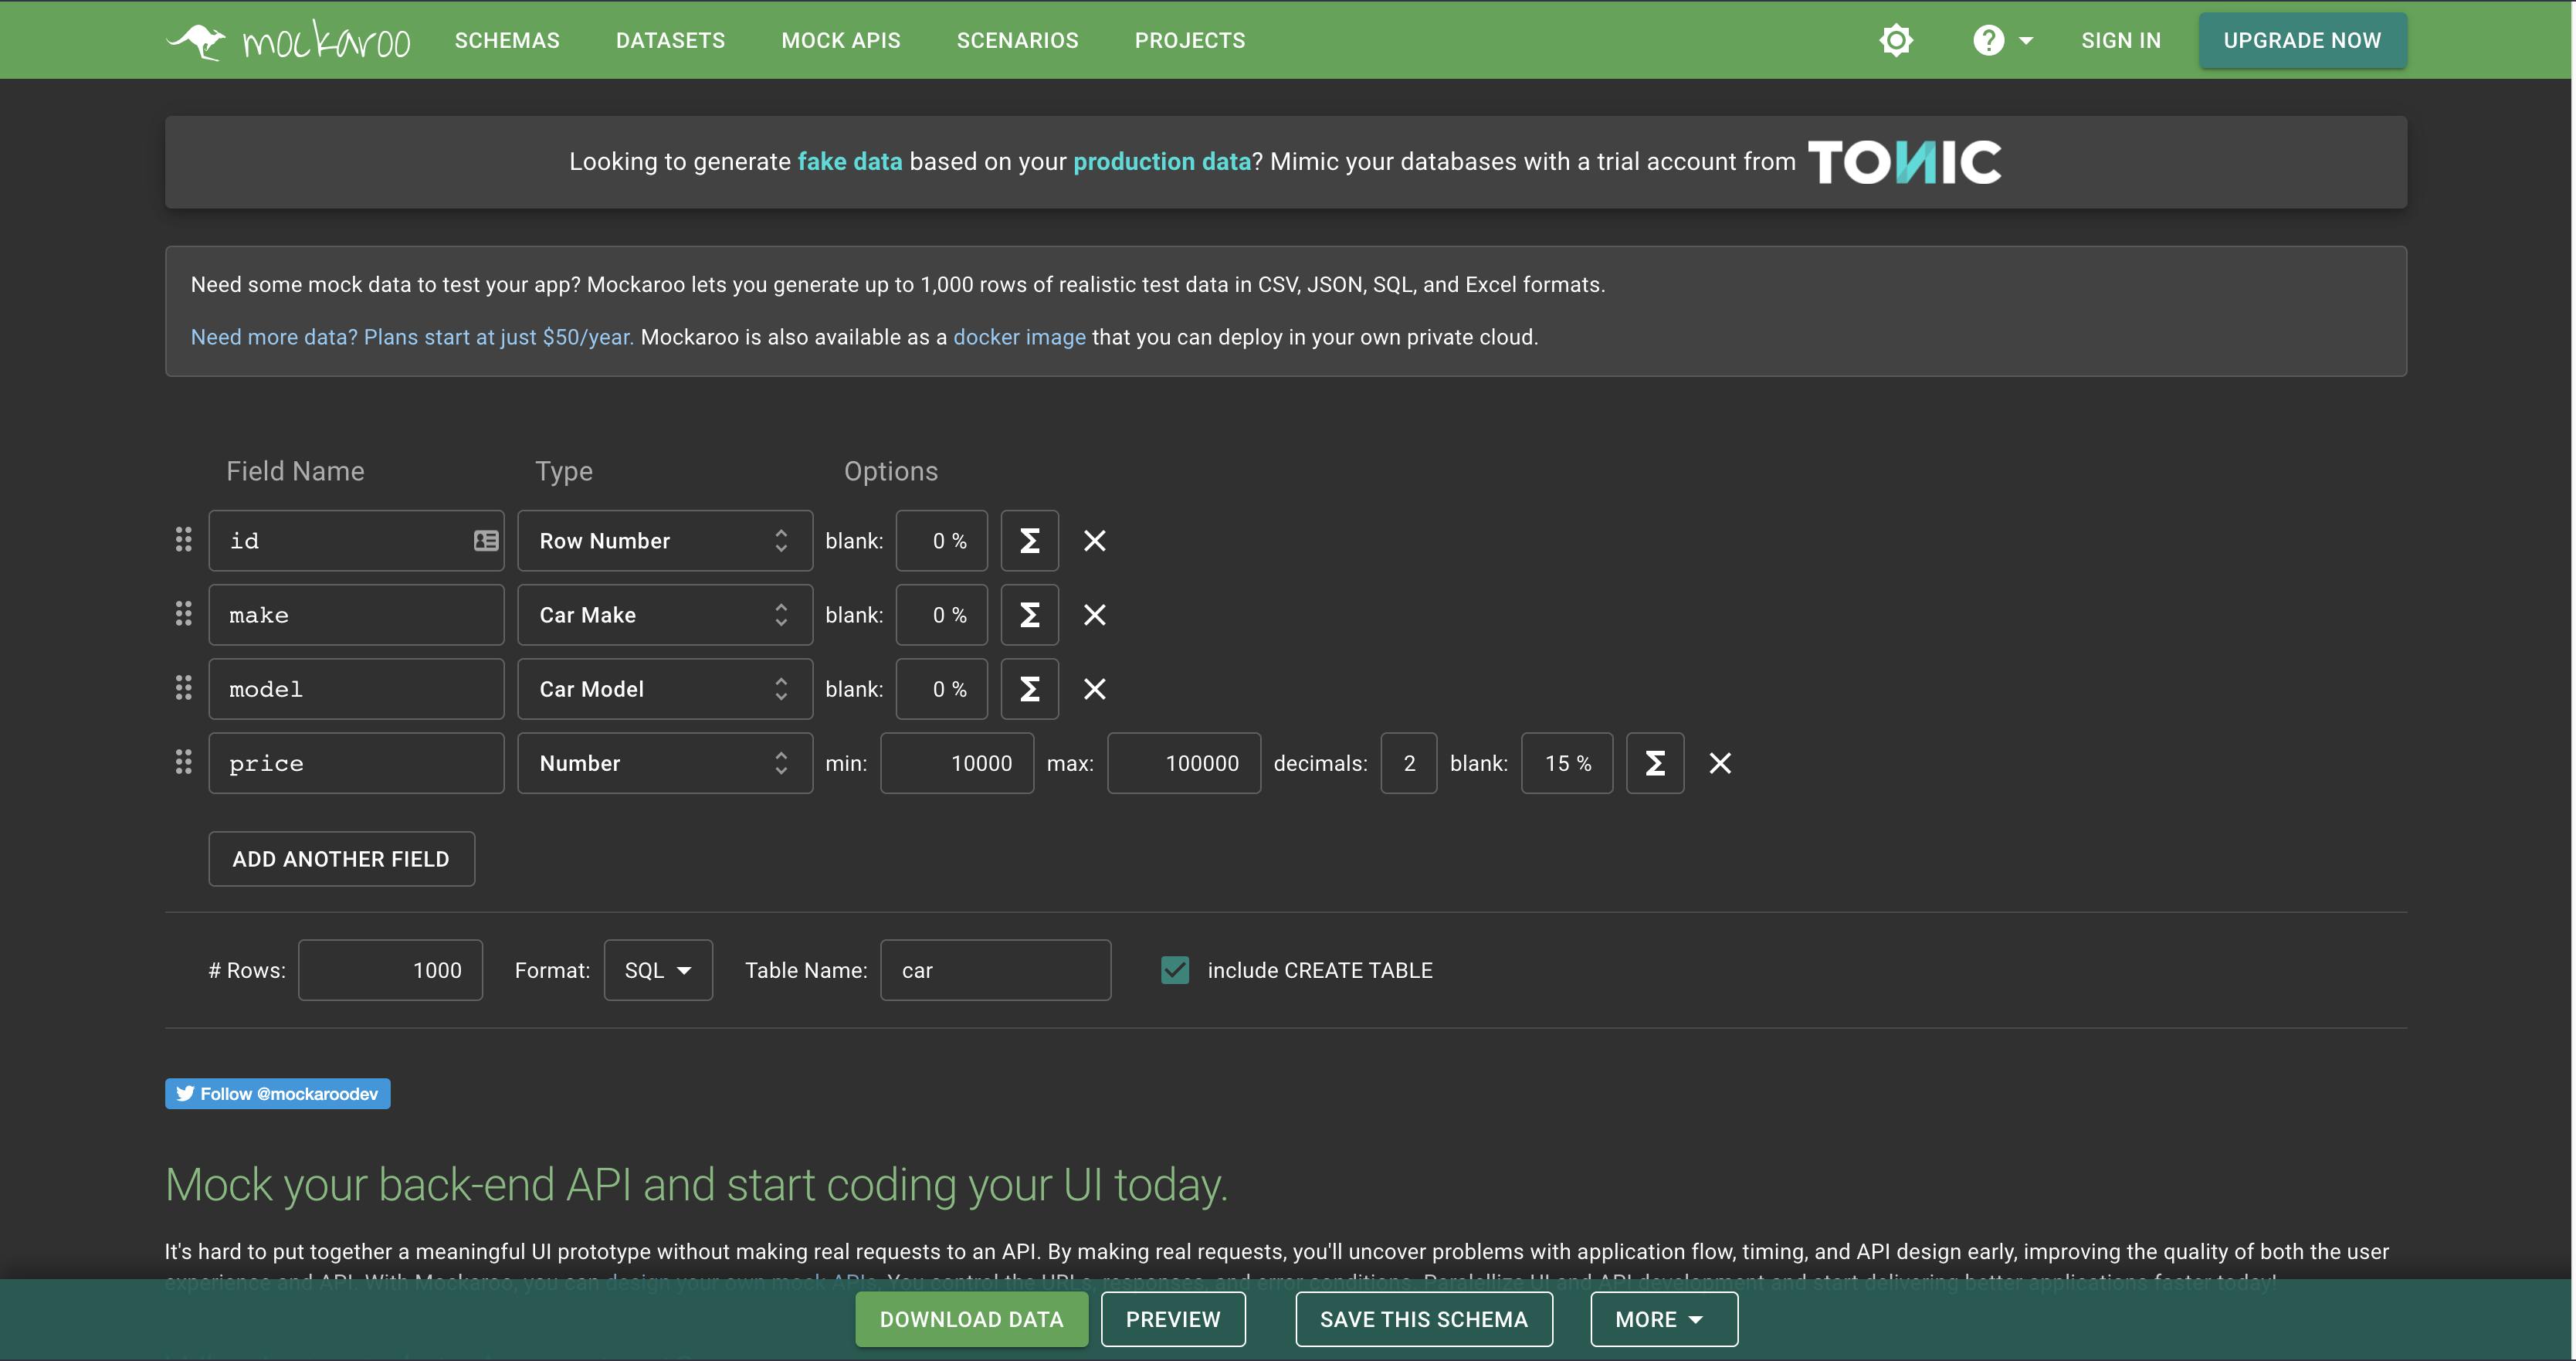
Important: For the purposes of this exercise, edit the downloaded car.sql file’s “CREATE TABLE” command to look like this:
CREATE TABLE car (
    id              BIGSERIAL           NOT NULL PRIMARY KEY,
    make        VARCHAR(50)        NOT NULL,
    model       VARCHAR(50)         NOT NULL,
    price           NUMERIC(19, 2)
);
We also need to remove the “id” column and its values from the insert - since we are using a BIGSERIAL data type for our id (these are automatically generated). Here is an example of how an insert command would look like (remember, the SQL commands can be in uppercase or lowercase, or both!).
INSERT INTO car (make, model, price) VALUES ('Honda', 'CR-Z', 27728.48);You can edit and re-use this file to create a fresh “car” table, populated with data whenever needed.
Execute an “.sql” file
Execute command(s) from a “.sql” file:
\i <path_to_your_directory>/file.sql
Drop the table "alien" and run the "alien.sql" file to create the table alien and populate it with data.
\i <path_to_your_directory>/alien.sql
Tip: If using "VSCode", you can right-click on the "alien.sql" and select "Copy Path", which copies the file's full system path into your clipboard, then just paste it after the "\i" command. Alternatively, you can navigate to the directory of your downloaded file and get the current working directory with the “pwd” command, which is the “<path_to_your_directory>”.
If no errors are present, you should see a lot of "INSERT 0 1" messages, meaning the table was created and the rows have been inserted.
If all went well, run:
SELECT * FROM alien;
to see the table populated with data.
Notice that some rows are missing an "email" and "species" values, which is as we defined in the table - these are not required and can be empty or "NULL".
Note that in this table view, you can scroll down until you reach the end (mouse wheel, directional arrows, page-up / page-down), or exit with the "q" key.
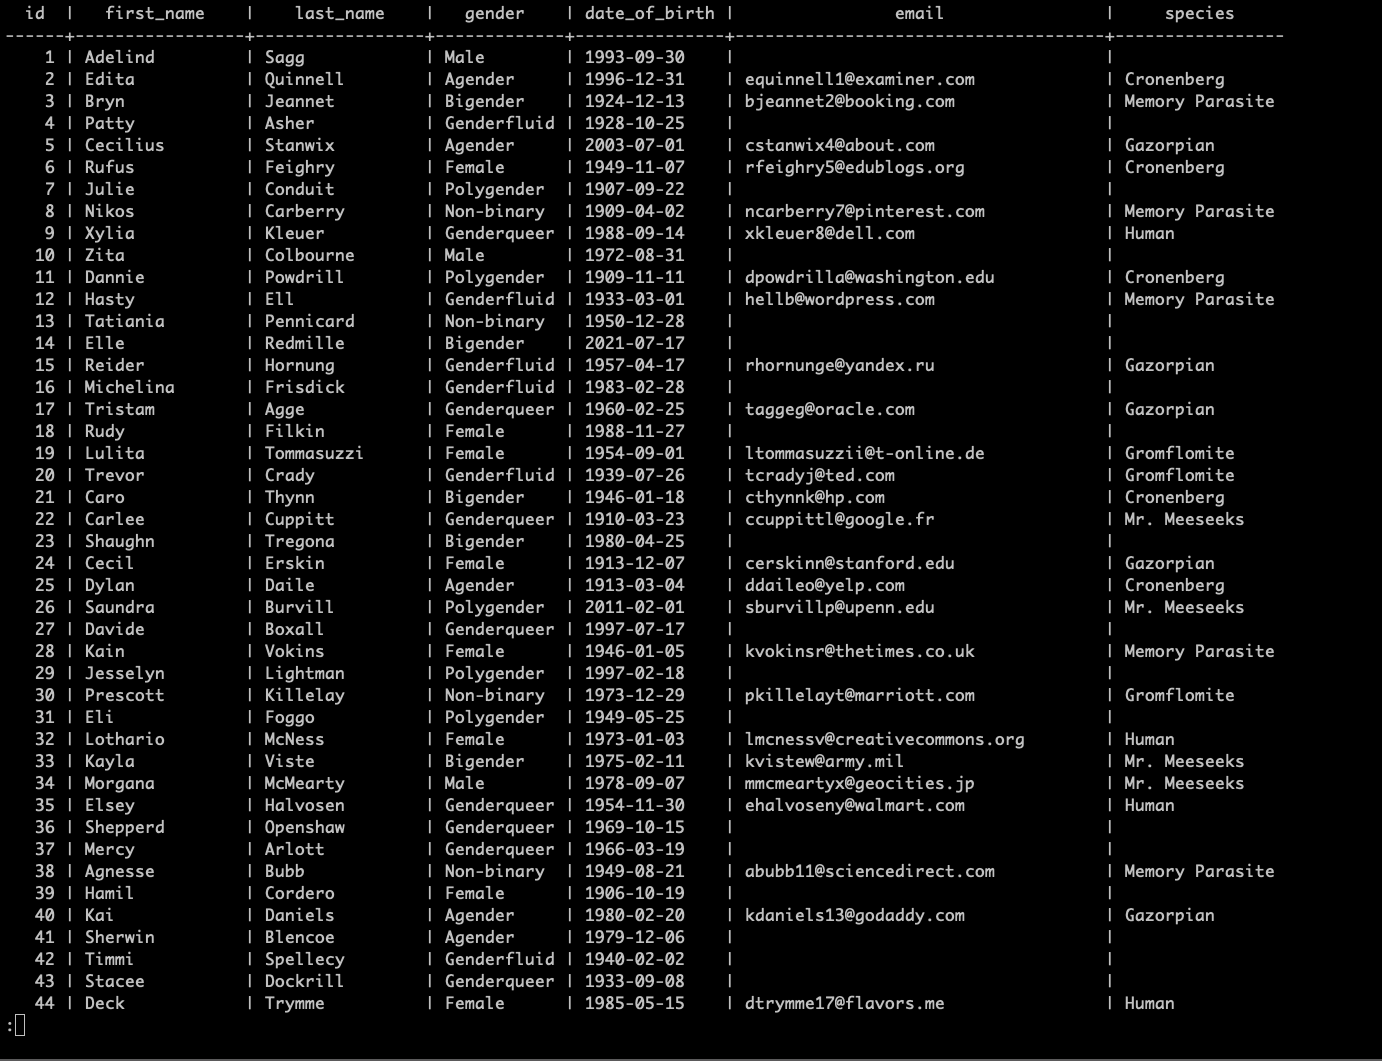
Table data
Selecting data
Select specific columns from a table:
SELECT column_name_1, column_name_2 FROM table_name;
Select specific columns from the table "alien":
SELECT first_name, last_name, gender, species FROM alien;
As you can see, the results contain only the columns we selected from the table.
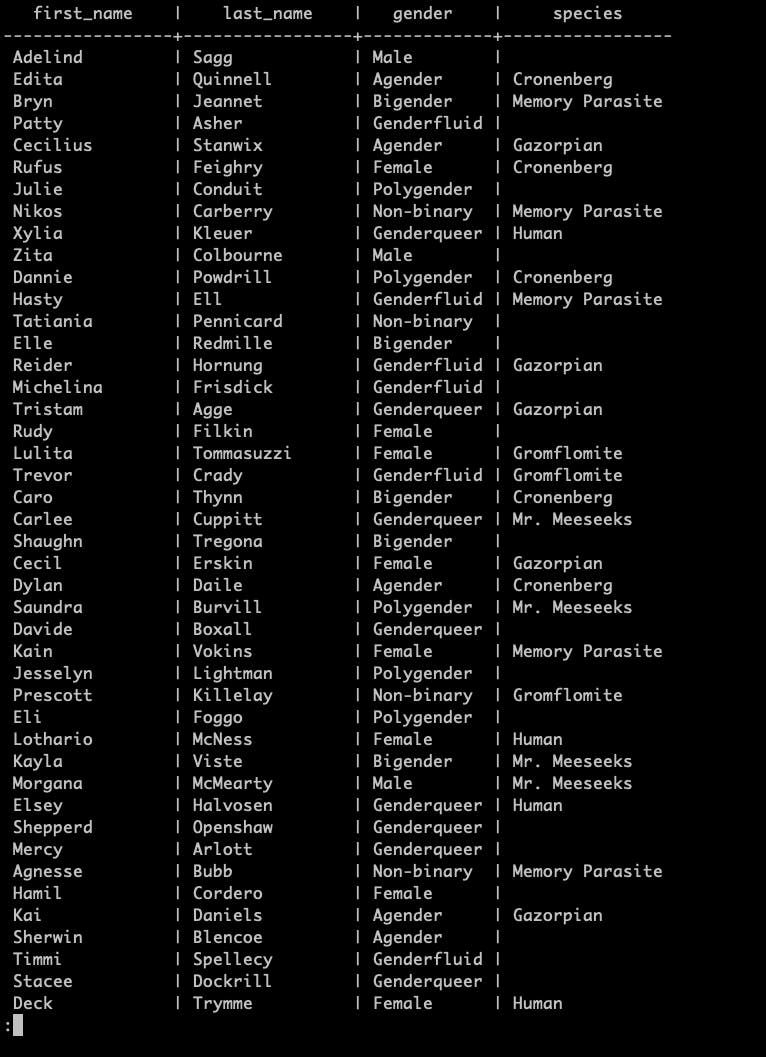
Select column data
Order
Keep in mind:
- ASC (Ascending) - 1, 2, 3, 4, 5, 6, 7, 8, 9, 10
- DESC (Descending) - 10, 9, 8, 7, 6, 5, 4, 3, 2, 1
Select data with order:
SELECT * FROM table_name ORDER BY column_name DESC;
Select data with order form table "alien":
SELECT * FROM alien
ORDER BY first_name DESC;
This gives us all rows ordered by "first_name" starting from the last letter of the alphabet "Z".
The default order value is "ASC", meaning we would get all rows ordered by "first_name" starting from the first letter of the alphabet "A".
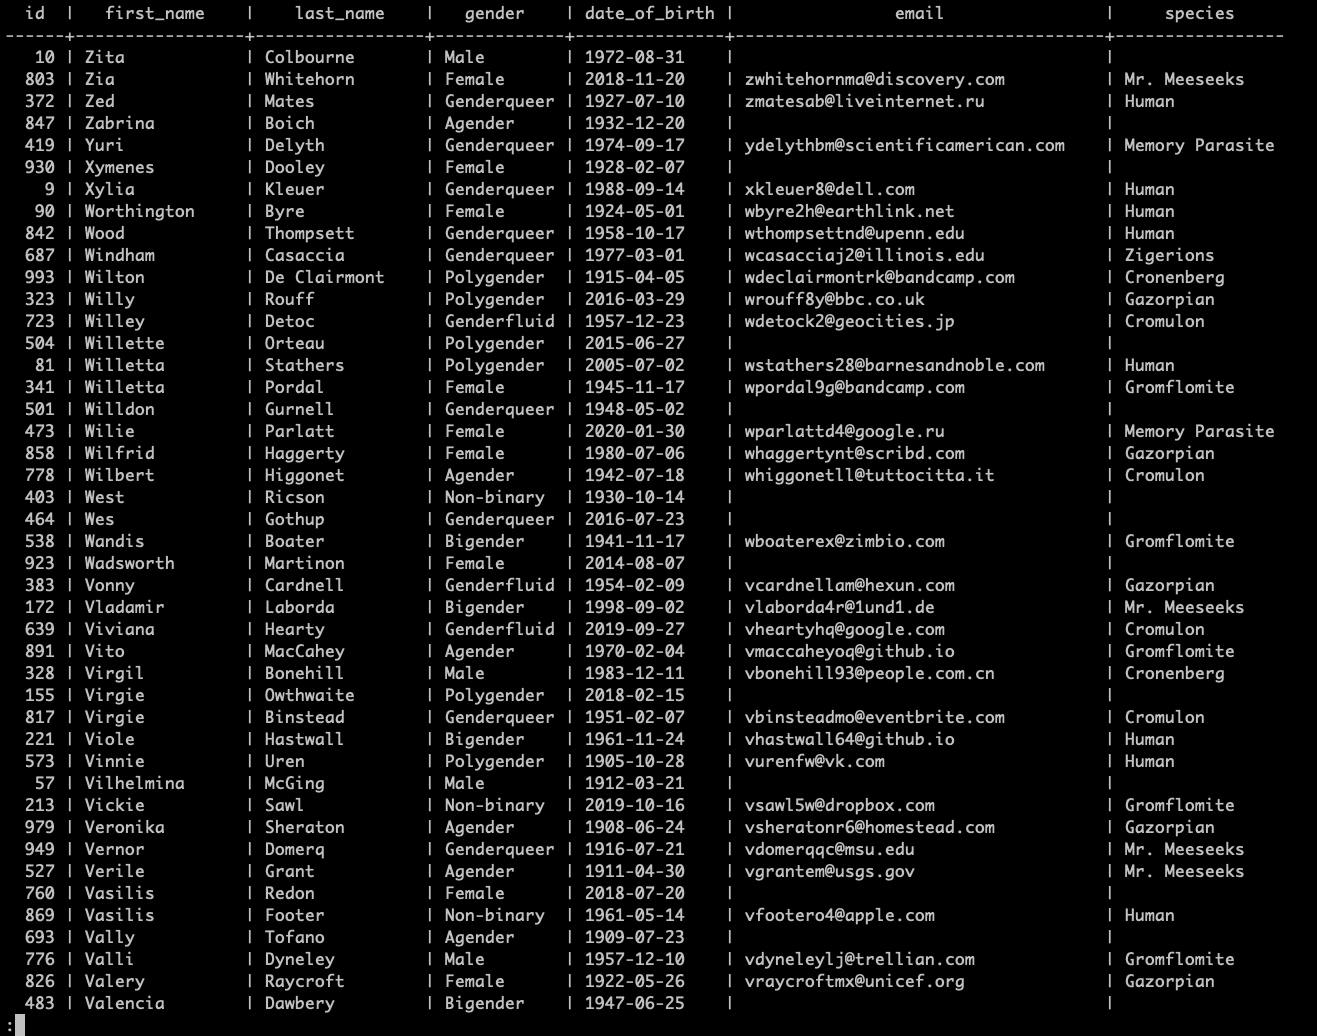
Select data with order
Distinct
Preview unique values from a column:
SELECT DISTINCT column_name FROM table_name ORDER BY column_name;
Select all unique species from table "alien":
SELECT DISTINCT species
FROM alien ORDER BY species;
Command results:
c137=# SELECT DISTINCT species
FROM alien ORDER BY species;
     species
-----------------
 Cromulon
 Cronenberg
 Gazorpian
 Gromflomite
 Human
 Memory Parasite
 Mr. Meeseeks
 Zigerions

(9 rows)
The above command returns "DISTINCT" or "unique" values present in the table rows, under the column "species", ordered ascending by "species".
You will notice that the 9 species that we got are the 9 species used to generate the sql file (if you followed the instructions above).
Where
The “WHERE” keyword allows us to filter the data based on conditions. Select all data from a table where a specific column meets a criteria:
SELECT * FROM table_name WHERE column_name = 'Value';
Select all rows from the table "alien" where the "gender" column has a value of "Female":
SELECT * FROM alien
WHERE gender = 'Female';
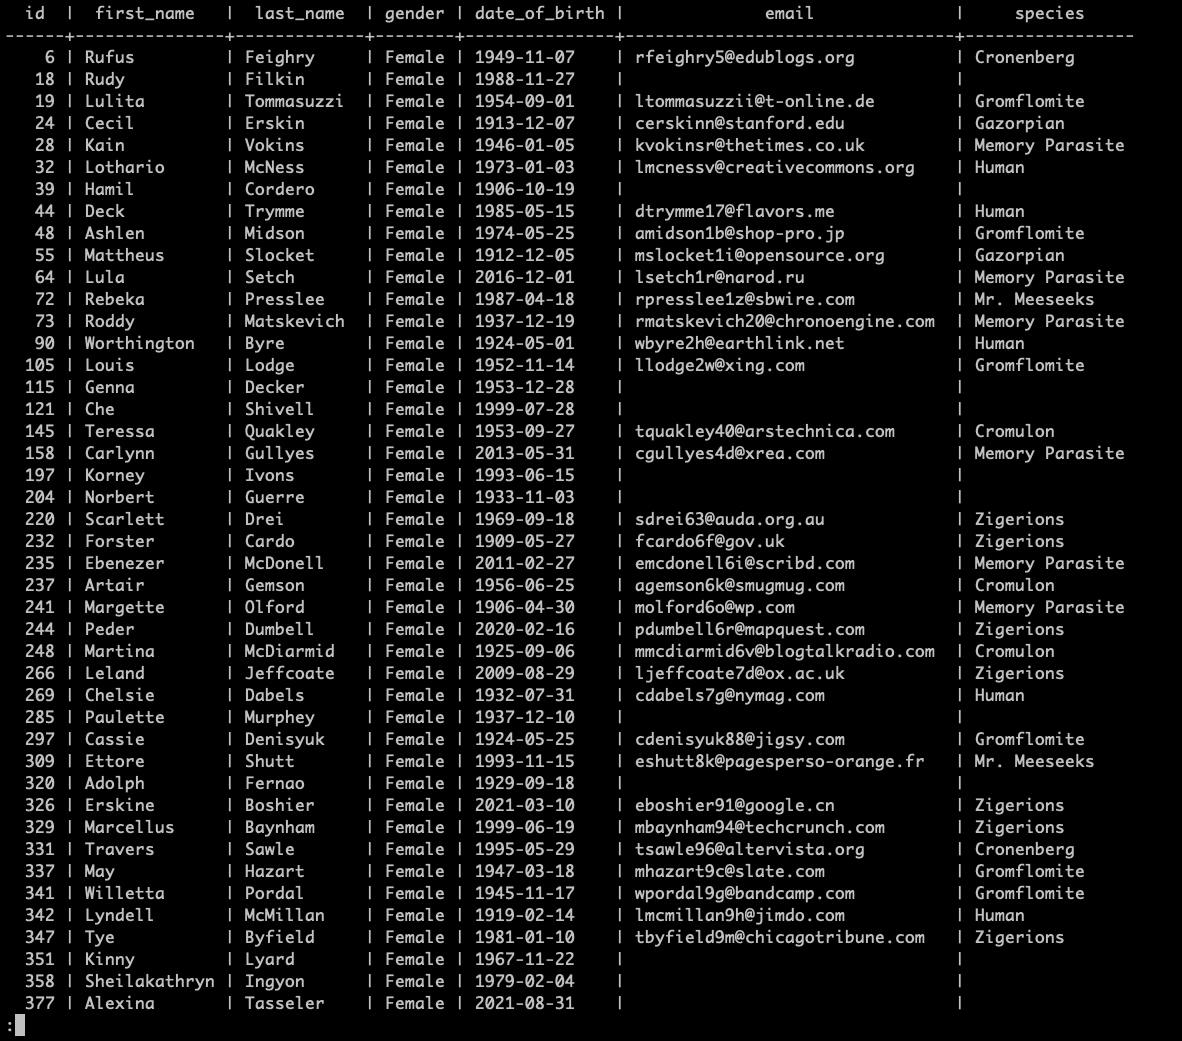
Select data with condition
Select all rows from table where multiple columns meet specific criteria:
SELECT * FROM table_name WHERE column_name_1 = 'Value_1' AND column_name_2 = 'Value_2';
Select all rows from the table "alien" where the "gender" column has a value of "Male" and the "species" column has a value of "Gromflomite":
SELECT * FROM alien
WHERE gender = 'Male'
AND species = 'Gromflomite';
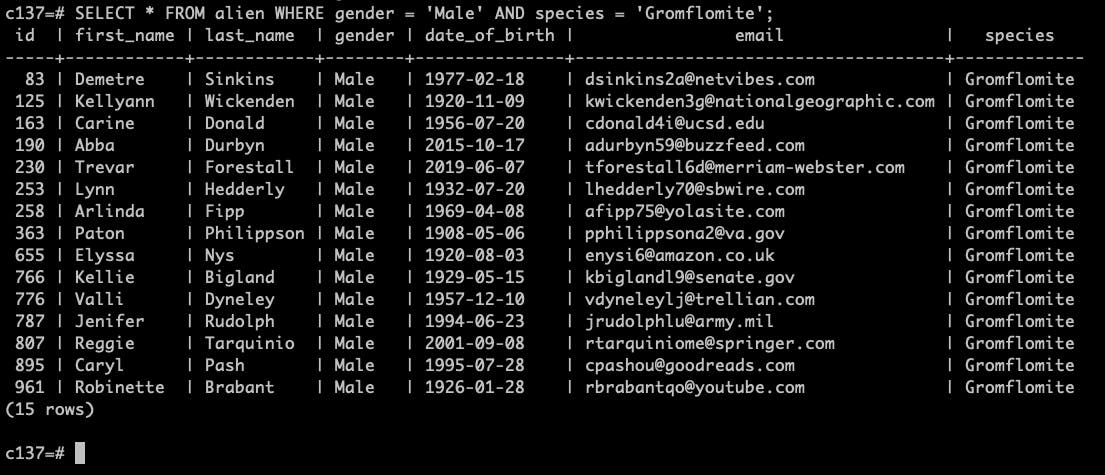
Select data with multiple conditions no.1
We can use the "AND" and "OR" keywords to combine select conditions. For example: Select all table rows from the table "alien" where gender is "Female" and "species" is either "Cronenberg" or "Gazorpian":
SELECT * FROM alien
WHERE gender = 'Female'
AND (species = 'Cronenberg' OR species = 'Gazorpian');
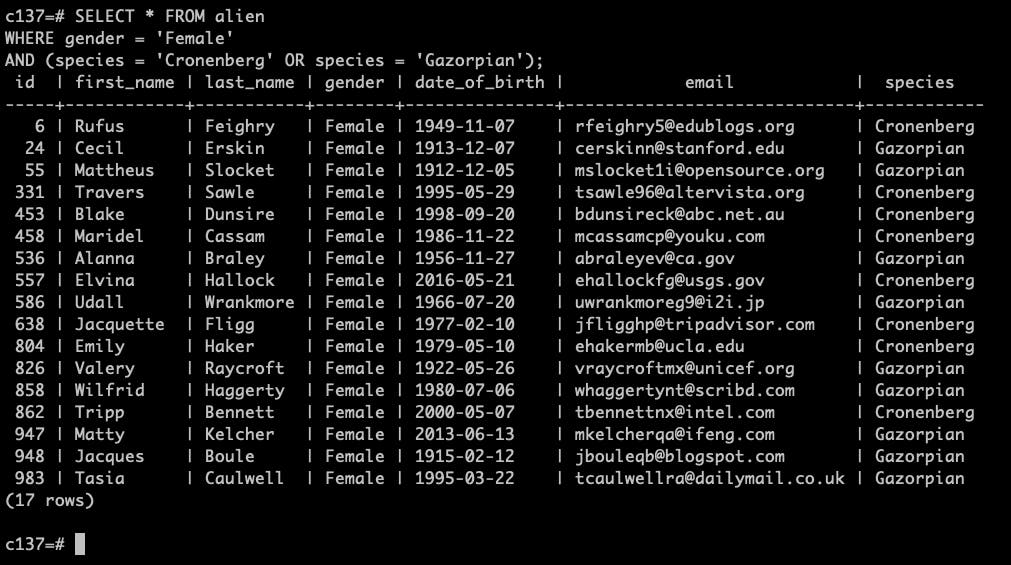
Select data with multiple conditions no.2
Comparisons
We can perform basic comparisons and operations using sql. A simple comparison:
SELECT 1 = 1;
returns:
- t = True
- f = False
Comparison example:
c137=# SELECT 1 = 1;
 ?column?
----------
 t
(1 row)
Note: The column name "?column?" is the default column name when one is not specified. We can name the column using the "AS" keyword:
SELECT 1 = 1 as comparison;
Comparison example 2:
c137=# SELECT 1 = 1 as comparison;
 comparison
------------
 t
(1 row)
Common operators in SQL:
- > - strictly greater than
- < - strictly less than
- <> - not equal
- + - addition
- - - subtraction
- = - equality
- <= - less than or equal to
- >= - greater than or equal to
Limit, offset and fetch
Use "LIMIT" and "OFFSET" keywords to skip rows when selecting data from a table and to apply an offset (meaning start getting data after skipping a certain amount of rows). This is usually used to achieve "pagination".
Select first "n" rows from the table:
SELECT * FROM table_name LIMIT n;
Select first "n" rows from the "alien" table:
SELECT * FROM alien LIMIT 10;
Select with limit example:
c137=# SELECT * FROM alien LIMIT 10;
 id | first_name | last_name |   gender    | date_of_birth |          email           |     species
----+------------+-----------+-------------+---------------+--------------------------+-----------------
  1 | Adelind    | Sagg      | Male        | 1993-09-30    |                          |
  2 | Edita      | Quinnell  | Agender     | 1996-12-31    | [email protected]  | Cronenberg
  3 | Bryn       | Jeannet   | Bigender    | 1924-12-13    | [email protected]    | Memory Parasite
  4 | Patty      | Asher     | Genderfluid | 1928-10-25    |                          |
  5 | Cecilius   | Stanwix   | Agender     | 2003-07-01    | [email protected]      | Gazorpian
  6 | Rufus      | Feighry   | Female      | 1949-11-07    | [email protected]   | Cronenberg
  7 | Julie      | Conduit   | Polygender  | 1907-09-22    |                          |
  8 | Nikos      | Carberry  | Non-binary  | 1909-04-02    | [email protected] | Memory Parasite
  9 | Xylia      | Kleuer    | Genderqueer | 1988-09-14    | [email protected]        | Human
 10 | Zita       | Colbourne | Male        | 1972-08-31    |                          |
(10 rows)
Select all rows after "n" rows:
SELECT * FROM table_name OFFSET n;
Select all rows after "n" rows from the table "alien":
SELECT * FROM alien OFFSET 5;
The results skipped the first 5 rows in this example (noticeable by "id" column).
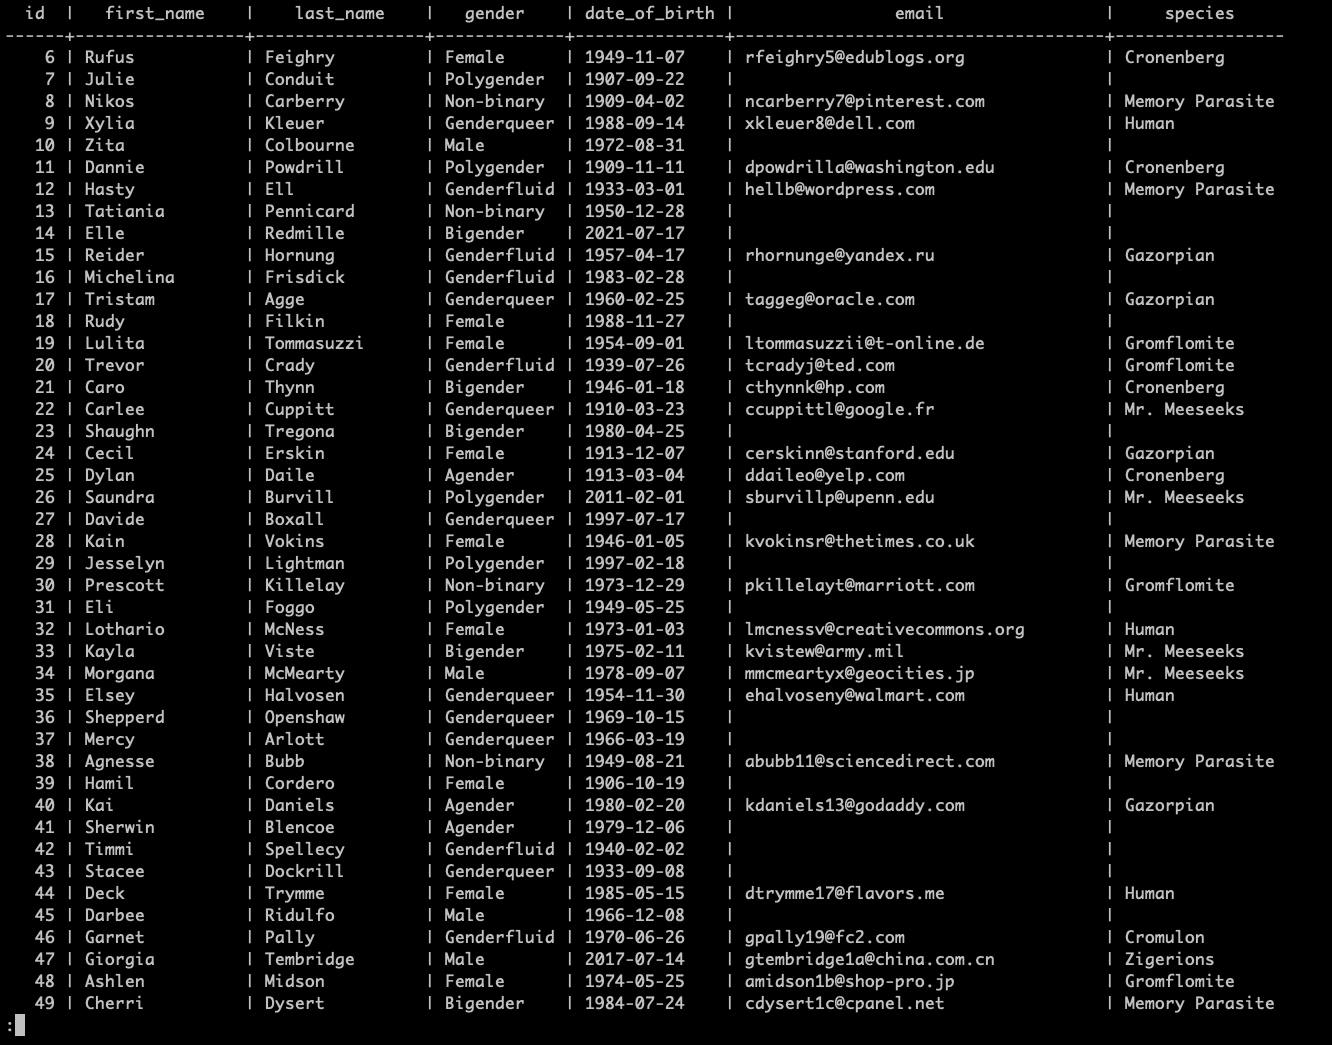
Select with offset
Select first "n" rows after "m" rows:
SELECT * FROM table_name LIMIT n OFFSET m;
Select first "n" rows after "m" rows from the table "alien":
SELECT * FROM alien
LIMIT 10 OFFSET 5;
The results skipped the first 5 rows in this example (noticeable by the "id" column) and are "limited" to an amount of 10.
c137=# SELECT * FROM alien LIMIT 10 OFFSET 5;
 id | first_name | last_name |   gender    | date_of_birth |           email           |     species
----+------------+-----------+-------------+---------------+---------------------------+-----------------
  6 | Rufus      | Feighry   | Female      | 1949-11-07    | [email protected]    | Cronenberg
  7 | Julie      | Conduit   | Polygender  | 1907-09-22    |                           |
  8 | Nikos      | Carberry  | Non-binary  | 1909-04-02    | [email protected]  | Memory Parasite
  9 | Xylia      | Kleuer    | Genderqueer | 1988-09-14    | [email protected]         | Human
 10 | Zita       | Colbourne | Male        | 1972-08-31    |                           |
 11 | Dannie     | Powdrill  | Polygender  | 1909-11-11    | [email protected] | Cronenberg
 12 | Hasty      | Ell       | Genderfluid | 1933-03-01    | [email protected]       | Memory Parasite
 13 | Tatiania   | Pennicard | Non-binary  | 1950-12-28    |                           |
 14 | Elle       | Redmille  | Bigender    | 2021-07-17    |                           |
 15 | Reider     | Hornung   | Genderfluid | 1957-04-17    | [email protected]       | Gazorpian
(10 rows)
Official SQL way to limit items from the query is by using "FETCH" (This example uses a different combination of keywords):
SELECT * FROM table_name OFFSET n FETCH FIRST m ROW ONLY;
Skip first 5 rows and the select the next 5 rows from the table "alien":
SELECT * FROM alien
OFFSET 5
FETCH FIRST 5 ROW ONLY;
Which is equivalent to:
SELECT * FROM alien
LIMIT 5 OFFSET 5;
Select data with fetch example:
c137=# SELECT * FROM alien OFFSET 5 FETCH FIRST 5 ROW ONLY;
 id | first_name | last_name |   gender    | date_of_birth |          email           |     species
----+------------+-----------+-------------+---------------+--------------------------+-----------------
  6 | Rufus      | Feighry   | Female      | 1949-11-07    | [email protected]   | Cronenberg
  7 | Julie      | Conduit   | Polygender  | 1907-09-22    |                          |
  8 | Nikos      | Carberry  | Non-binary  | 1909-04-02    | [email protected] | Memory Parasite
  9 | Xylia      | Kleuer    | Genderqueer | 1988-09-14    | [email protected]        | Human
 10 | Zita       | Colbourne | Male        | 1972-08-31    |                          |
(5 rows)
In
Use the "IN" keyword to specify filtering conditions.
SELECT * FROM table_name WHERE column_name IN ('value1', 'value2', 'value3');Select every row from the table "alien" whose "species" column has values "Human", "Cromulon" or "Mr. Meeseeks":
SELECT * FROM alien WHERE species = 'Human'
OR species = 'Cromulon'
OR species = 'Mr. Meeseeks';
Using "IN" keyword:
SELECT * FROM alien
WHERE species IN ('Human', 'Cromulon', 'Mr. Meeseeks');
In both cases, we should get the same results:
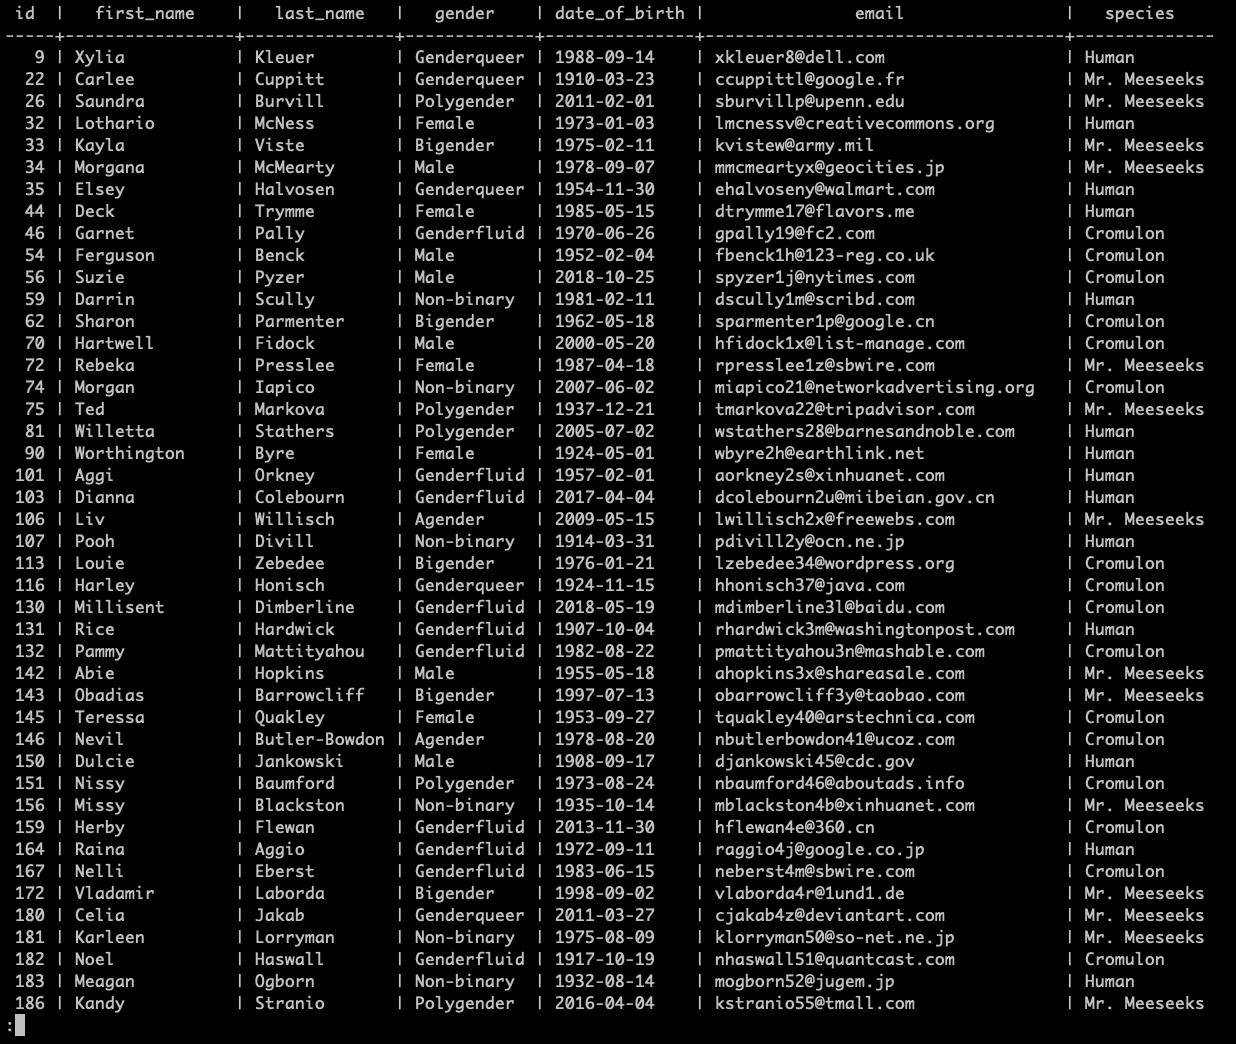
Select with ‘in’
Between
Select rows from a table based on a range of column values (of dates in this case):
SELECT * FROM table_name WHERE column_name BETWEEN DATE 'value1' AND 'value2';
Select rows from the table "alien" based on the "date_of_birth" column value (being between 2 specific date values):
SELECT * FROM alien
WHERE date_of_birth
BETWEEN DATE '2000-01-01' AND '2021-01-01';
Notice that the "date_of_birth" column values are between our 2 dates from the select command: "2000-01-01" and "2021-01-01".
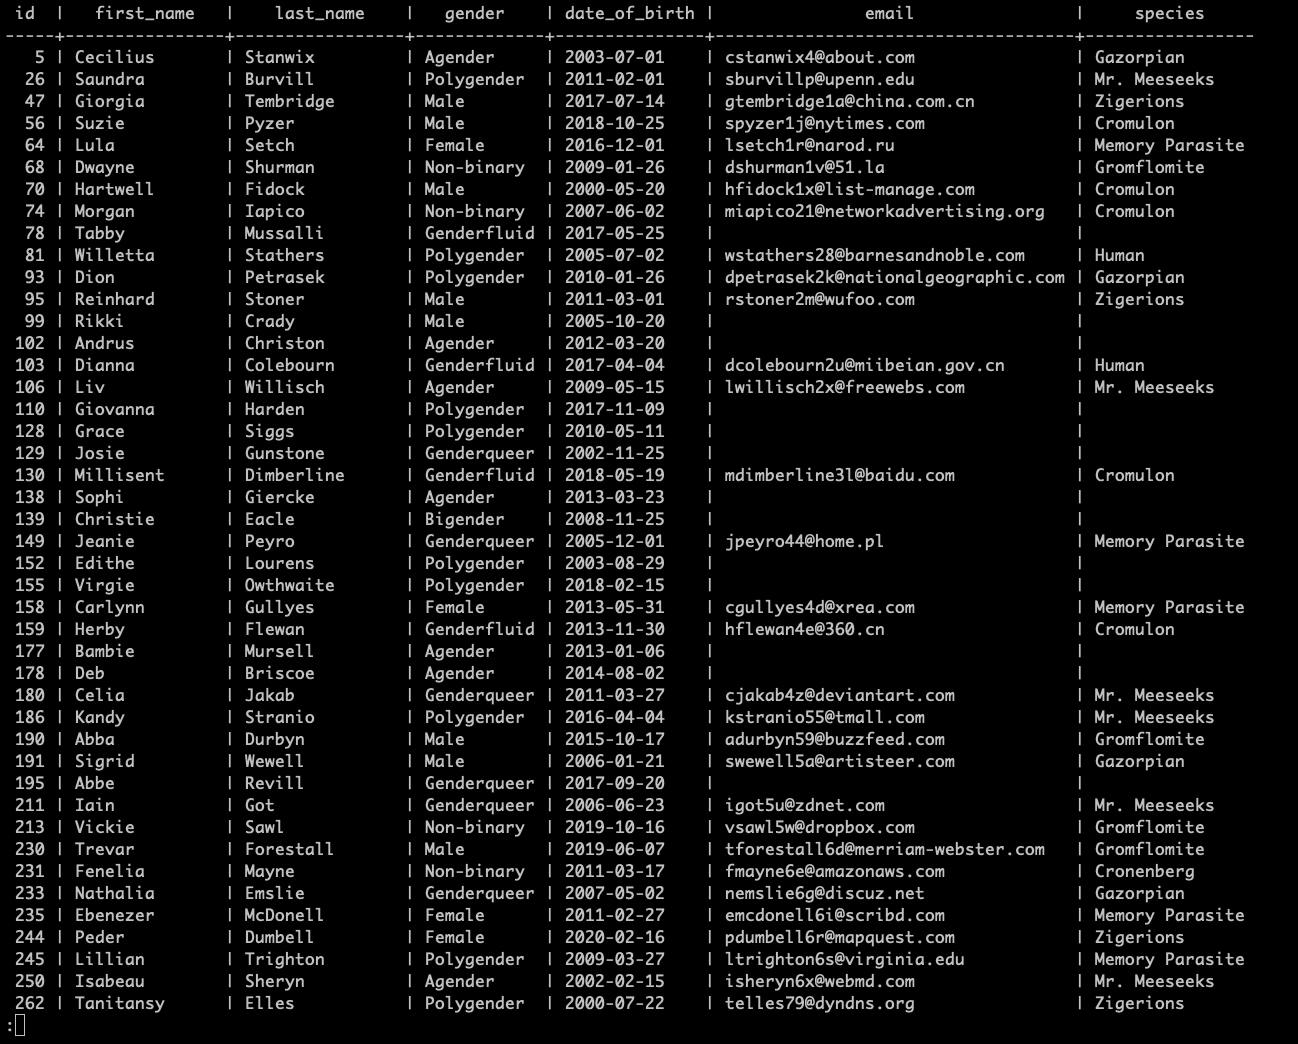
Select with 'between'
Like and iLike
Using the “LIKE” and “ILIKE” keywords, we can match text values against patterns using wildcards.
"%" - wildcard symbol; Any character before / after.
Find all column values ending in some value syntax:
SELECT * FROM table_name WHERE column_name LIKE '%Value';
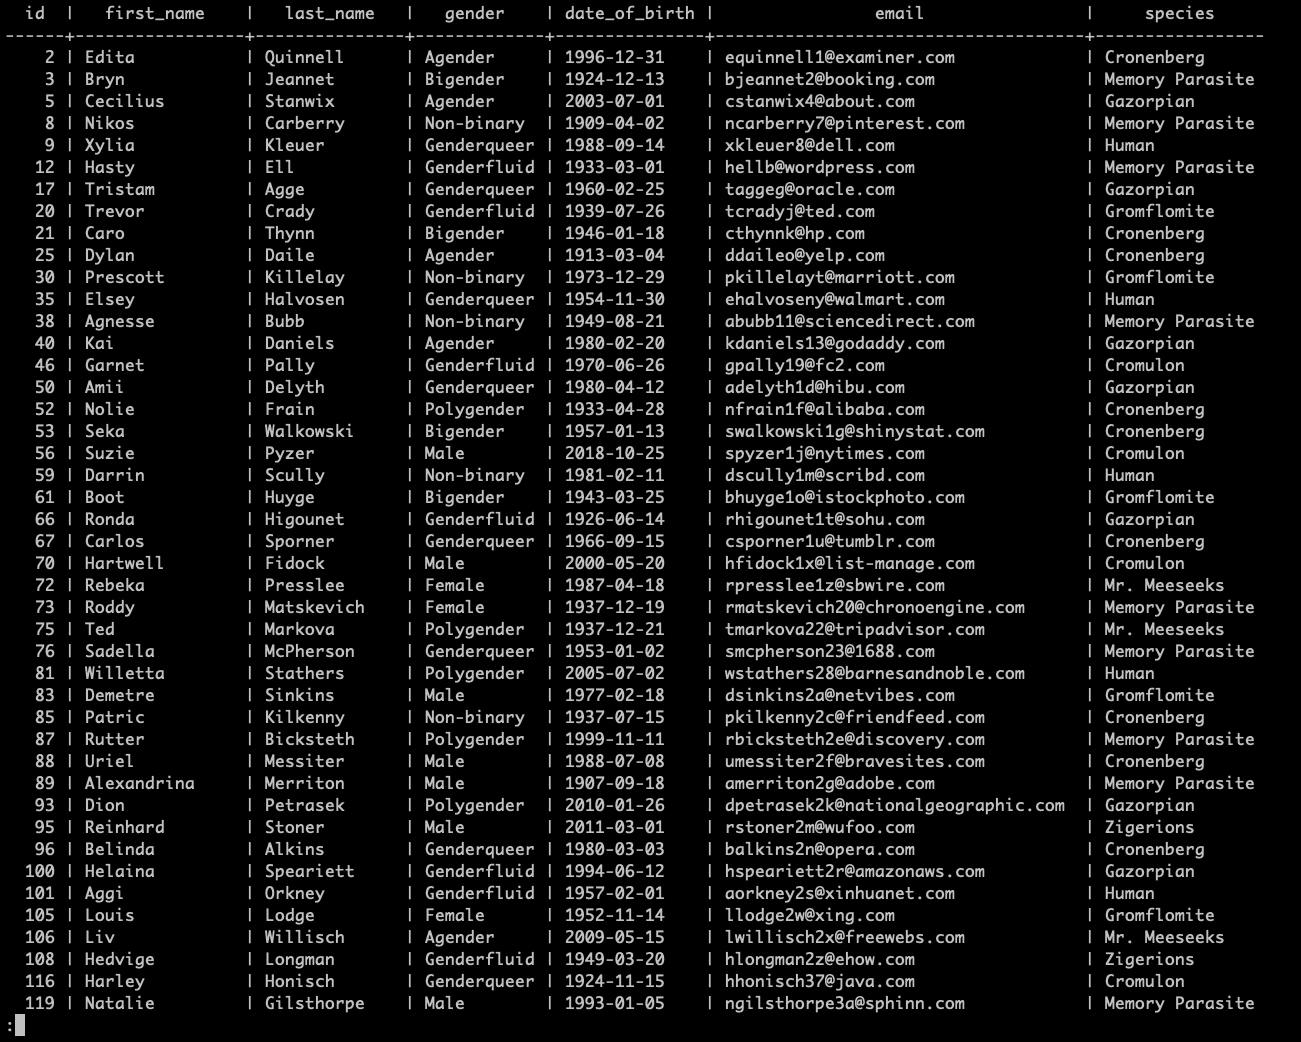
Select all rows from the "alien" table where the "email" column value ends in ".com":
SELECT * FROM alien
WHERE email LIKE '%.com';
Notice that the "email" column values all end with ".com".
Select with 'like' no.1
Select all rows from the table where column name is like the provided wildcard - “_________@%” - where the underscore (“_”) means any character, and there being 9 underscores (“_________”) in this case this means any 9 characters followed by an “@” symbol and then any character thereafter.
SELECT * FROM table_name WHERE column_name LIKE '_________@%'
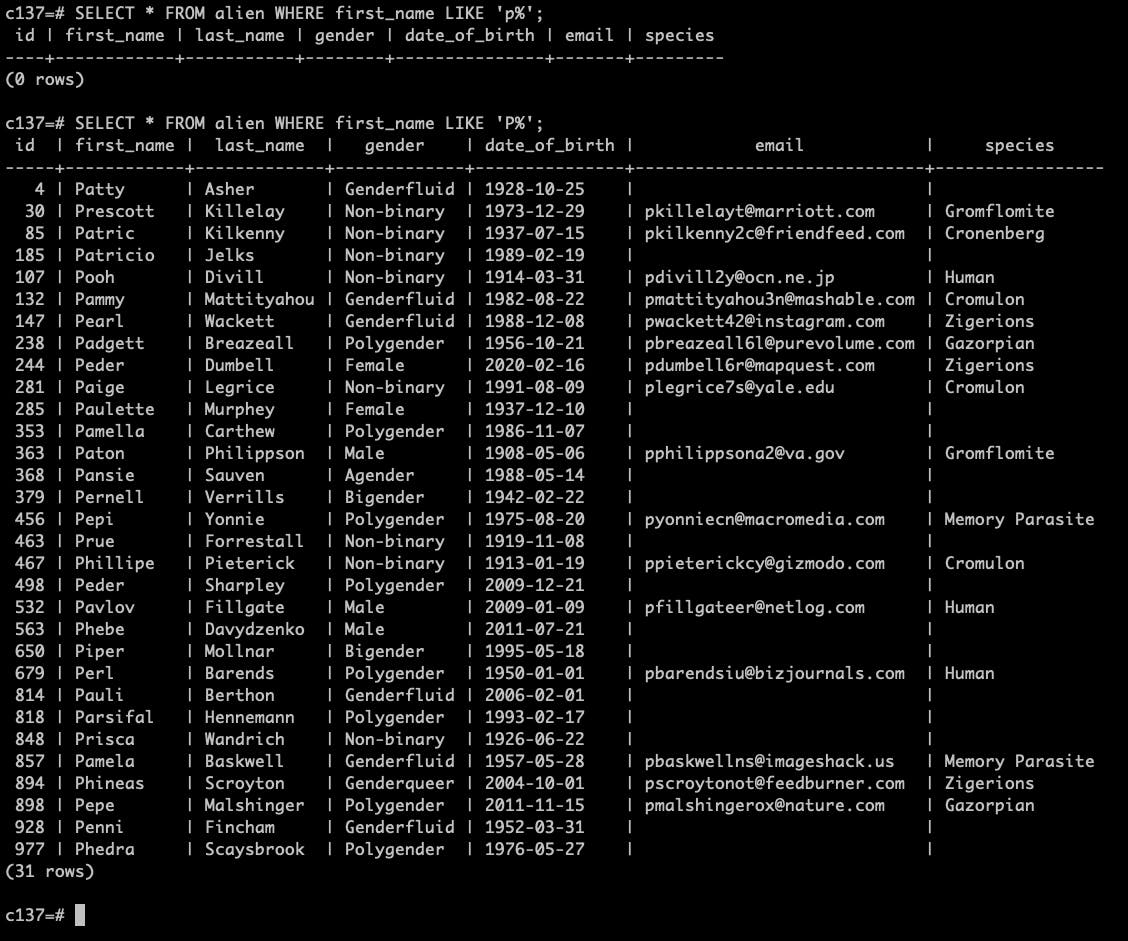
Select all rows from the table where "column" values start with lowercase letter:
SELECT * FROM table_name
WHERE column_name LIKE 'p%';
Select all rows from the table where "column" values start with upper case letter:
SELECT * FROM table_name
WHERE column_name LIKE 'P%';
Select all rows from the table where "column" values start with both the upper and lower case letter:
SELECT * FROM table_name
WHERE column_name ILIKE 'p%';
Feel free to try these out by yourself. Note that this select yields no results because all "first_name" column values start with an uppercase letter:
SELECT * FROM alien
WHERE first_name LIKE 'p%';
Select with 'like' no.2
Group By
When selecting table rows, we can group them by specific column and add additional columns that perform an operation for us. For example:
Select countries from the table "alien", add a "count" column that counts all of the entries, grouping by "species", meaning we will get a list of unique "species" with counts of how many times they occur in the table. "COUNT(*)" means count all occurrences.
SELECT species, COUNT(*)
FROM alien
GROUP BY species;
Select with 'group by' example:
c137=# SELECT species, COUNT(*) FROM alien GROUP BY species;
     species     | count
-----------------+-------
                 |   314
 Memory Parasite |    95
 Zigerions       |    71
 Gromflomite     |    98
 Cronenberg      |    73
 Mr. Meeseeks    |    92
 Human           |    74
 Cromulon        |    94
 Gazorpian       |    89
(9 rows)
In these results, we can see that the select command returned all of our "unique species" from the table "alien", and how many times they occur in the row data. If we were to sum all of the values in the "count" column, we would get 1000, which is the exact amount of rows present in the table "alien" at the moment (if no rows were added / removed).
Note that the "first row value" for "species" is "empty", meaning there are "X" amount of records (in this case 314) that do not have a value for the "species" column.
Group by having
"Group By Having" allows for extra filtering after the aggregation of group by.
Same as above example, except by adding a "HAVING" keyword followed by a "function" (comparison) we further filter out all rows that have a "count" greater than a specified value (number in this case):
SELECT species, COUNT(*)
FROM alien
GROUP BY species
HAVING COUNT(*) > 80
ORDER BY species;
In these results, we can see that we are missing the "Human", "Cronenberg" and "Zigerions" rows, because the "counts" of these do not satisfy the "comparison" defined after "HAVING" keyword ("COUNT(*) > 80").
Select with 'group by having' example:
c137=# SELECT species, COUNT(*)
FROM alien
GROUP BY species
HAVING COUNT(*) > 80
ORDER BY species;
     species     | count
-----------------+-------
 Cromulon        |    94
 Gazorpian       |    89
 Gromflomite     |    98
 Memory Parasite |    95
 Mr. Meeseeks    |    92
                 |   314
(6 rows)
Max, Min & Sum
For these examples, we will use a different table called "car".
First of all, create the table and insert the data using psql's "\i" command.
\i <path_to_your_directory>/car.sql
Maximum column value syntax:
SELECT MAX(column_name) FROM table_name;
Minimum column value syntax:
SELECT MIN(column_name) FROM table_name;
Sum of column values syntax:
SELECT SUM(column_name) FROM table_name;
Average of column values syntax:
SELECT AVG(column_name) FROM table_name;
Round average of column values syntax:
SELECT ROUND(AVG(column_name)) FROM table_name;
Note: "ROUND" by default rounds up to an "integer", if you pass a number "n" as a second parameter, the value will be rounded to "n" decimals (see example below).
Examples of usage on "car" table:
SELECT MAX(price) FROM car;
SELECT MIN(price) FROM car;
SELECT SUM(price) FROM car;
SELECT AVG(price) FROM car;
SELECT ROUND(AVG(price)) FROM car;
Average value rounded to 2 decimals:
SELECT ROUND(AVG(price), 2) FROM car;
Select data min, max, sum, avg, round examples:
c137=# SELECT MAX(price) FROM car;
   max
----------
 99926.79
(1 row)

c137=# SELECT MIN(price) FROM car;
   min
----------
 10022.40
(1 row)

c137=# SELECT SUM(price) FROM car;
     sum
-------------
 48301679.88
(1 row)

c137=# SELECT AVG(price) FROM car;
        avg
--------------------
 55775.611870669746
(1 row)

c137=# SELECT ROUND(AVG(price)) FROM car;
 round
-------
 55776
(1 row)

c137=# SELECT ROUND(AVG(price), 2) FROM car;
  round
----------
 55775.61
(1 row)
Alias
When performing select(s) / calculations, you can use keyword "AS" to name a column, example:
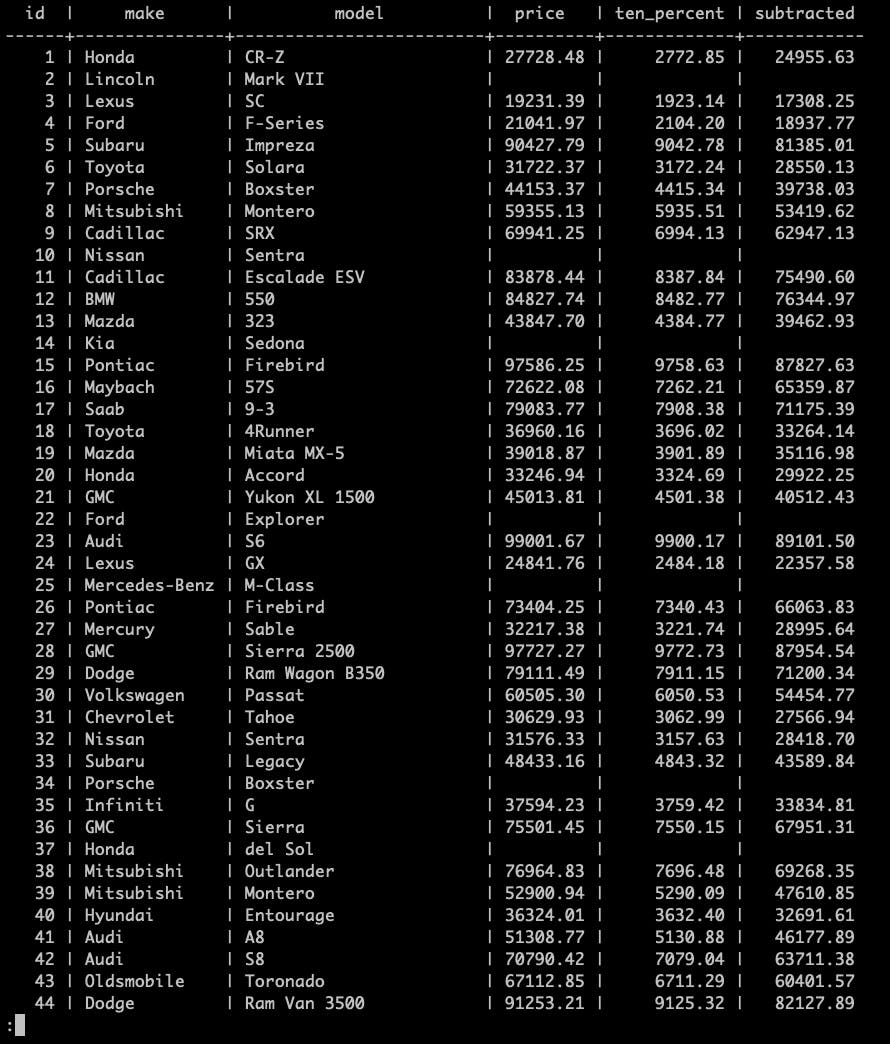
SELECT id, make, model, price,
ROUND(price * .10, 2) AS ten_percent,
ROUND(price - (price * .10), 2) AS subtracted
FROM car;
Explanation: Select "id", "make", "model" and "price", create a column "ten_percent" with a value equal to "price * 0.10", rounded to "2" decimals, create a column "subtracted" with a value equal to "price - (price * 0.10)", rounded to "2" decimals, from table "car".
The "ten_percent" column is a 10% value of price column value.
The "subtracted" column is a price subtracted by its 10% value.
You can use "AS" to override column names as well.
Select data alias
Coalesce
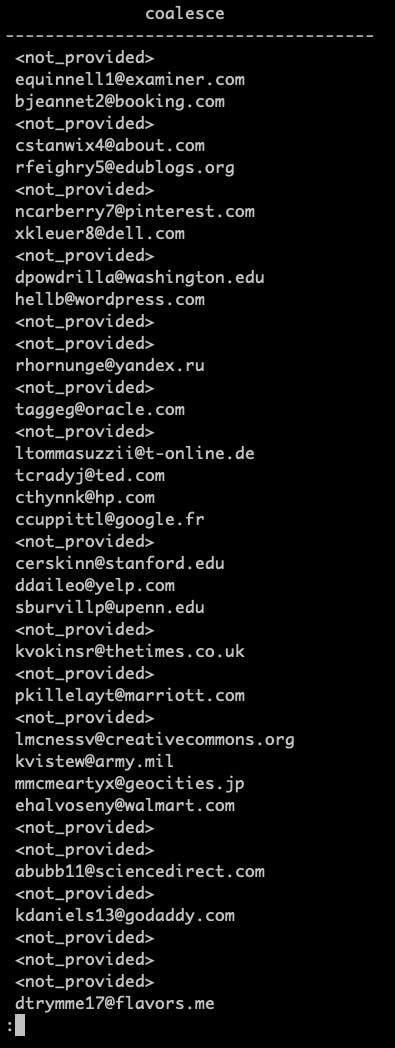
"Coalesce" keyword allows us to have a "default value" in case one is not provided.
This example will get all "emails" from the table "alien", and put the "<not_provided>" string in place of missing row values:
SELECT COALESCE(email, '<not_provided>') FROM alien;
Datetime & Timestamp
We can get "datetime" and "timestamp" values, as well as "cast" them when selecting.
You can cast the values by wrapping them in other functions (ex: "SELECT DATE(NOW());") or by using an operator.
Note: the casting operator here is "::", ex: in "SELECT NOW()::DATE;" - "SELECT NOW()" returns datetime in "YYYY-MM-DD HH:MM:SS+TT" format, and the "::DATE" casts that value to a date format - "YYYY-MM-DD".
This example returns date with time, including timezone - "YYYY-MM-DD HH:MM:SS+TT"
SELECT NOW();
This example returns a date in "YYYY-MM-DD" format:
SELECT DATE(NOW());
Which is the same as:
SELECT NOW()::DATE;
This example returns "Time" - "HH:MM:SS"
SELECT NOW()::TIME;
Select data datetime examples:
c137=# SELECT NOW();
              now
-------------------------------
 2021-10-13 10:45:37.476628+00
(1 row)

c137=# SELECT DATE(NOW());
    date
------------
 2021-10-13
(1 row)

c137=# SELECT NOW()::DATE;
    now
------------
 2021-10-13
(1 row)

c137=# SELECT NOW()::TIME;
      now
----------------
 10:45:51.79462
(1 row)
We can perform "addition" and "subtraction" on dates:
Add one year from now:
SELECT NOW() + INTERVAL '1 YEAR';
Subtract 1 year from now:
SELECT NOW() - INTERVAL '1 YEARS';
NOTE: Both "YEAR" and "YEARS" will work.
Add 10 months from now:
SELECT NOW() + INTERVAL '10 MONTH';
Subtract 10 months from now:
SELECT NOW() + INTERVAL '10 MONTH';
NOTE: Both "MONTH" and "MONTHS" will work.
Add 23 days from now:
SELECT NOW() + INTERVAL '23 DAY';
Subtract 23 days from now:
SELECT NOW() - INTERVAL '23 DAYS';
NOTE: Both "DAY" and "DAYS" will work.
Extract year from now:
SELECT EXTRACT(YEAR FROM NOW());
These also work:
- DOW - day of the week (Sunday = 0)
- CENTURY - century
Select data datetime example 2:
c137=# SELECT NOW() + INTERVAL '1 YEAR';
SELECT NOW() - INTERVAL '1 YEARS';
SELECT NOW() + INTERVAL '10 MONTH';
SELECT NOW() - INTERVAL '10 MONTHS';
SELECT NOW() + INTERVAL '23 DAY';
SELECT NOW() - INTERVAL '23 DAYS';
SELECT EXTRACT(YEAR FROM NOW());
           ?column?
-------------------------------
 2022-10-13 10:48:22.113162+00
(1 row)

           ?column?
-------------------------------
 2020-10-13 10:48:22.115195+00
(1 row)

           ?column?
-------------------------------
 2022-08-13 10:48:22.116629+00
(1 row)

           ?column?
-------------------------------
 2020-12-13 10:48:22.118124+00
(1 row)

           ?column?
-------------------------------
 2021-11-05 10:48:22.119401+00
(1 row)

           ?column?
-------------------------------
 2021-09-20 10:48:22.120769+00
(1 row)

 extract
---------
    2021
(1 row)
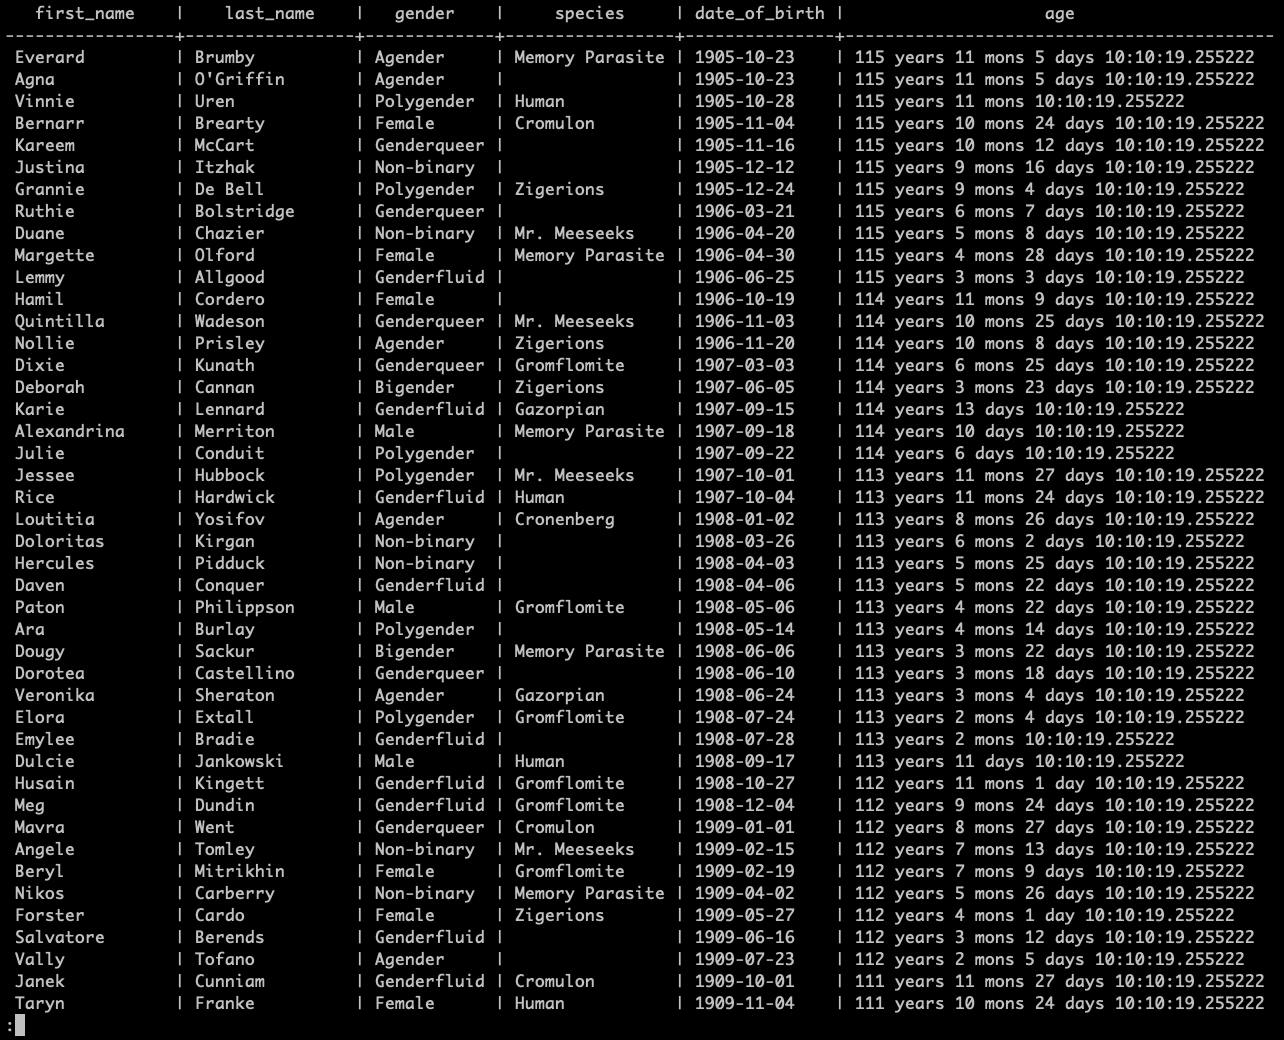
From the table "alien", calculate alien's age using "AGE" function, which takes 2 parameters: The starting point form which you want to subtract dates, and the date to subtract, in our case the first parameter is "NOW()" and the second is the actual "date of birth" of the alien. For better view, order by the "age", "descending":
SELECT first_name, last_name, gender, species, date_of_birth, AGE(NOW(), date_of_birth)
FROM alien
ORDER BY age DESC;
Here we can see that some of the "oldest aliens" in our table are more than "115 years old"!
Select data datetime no.3
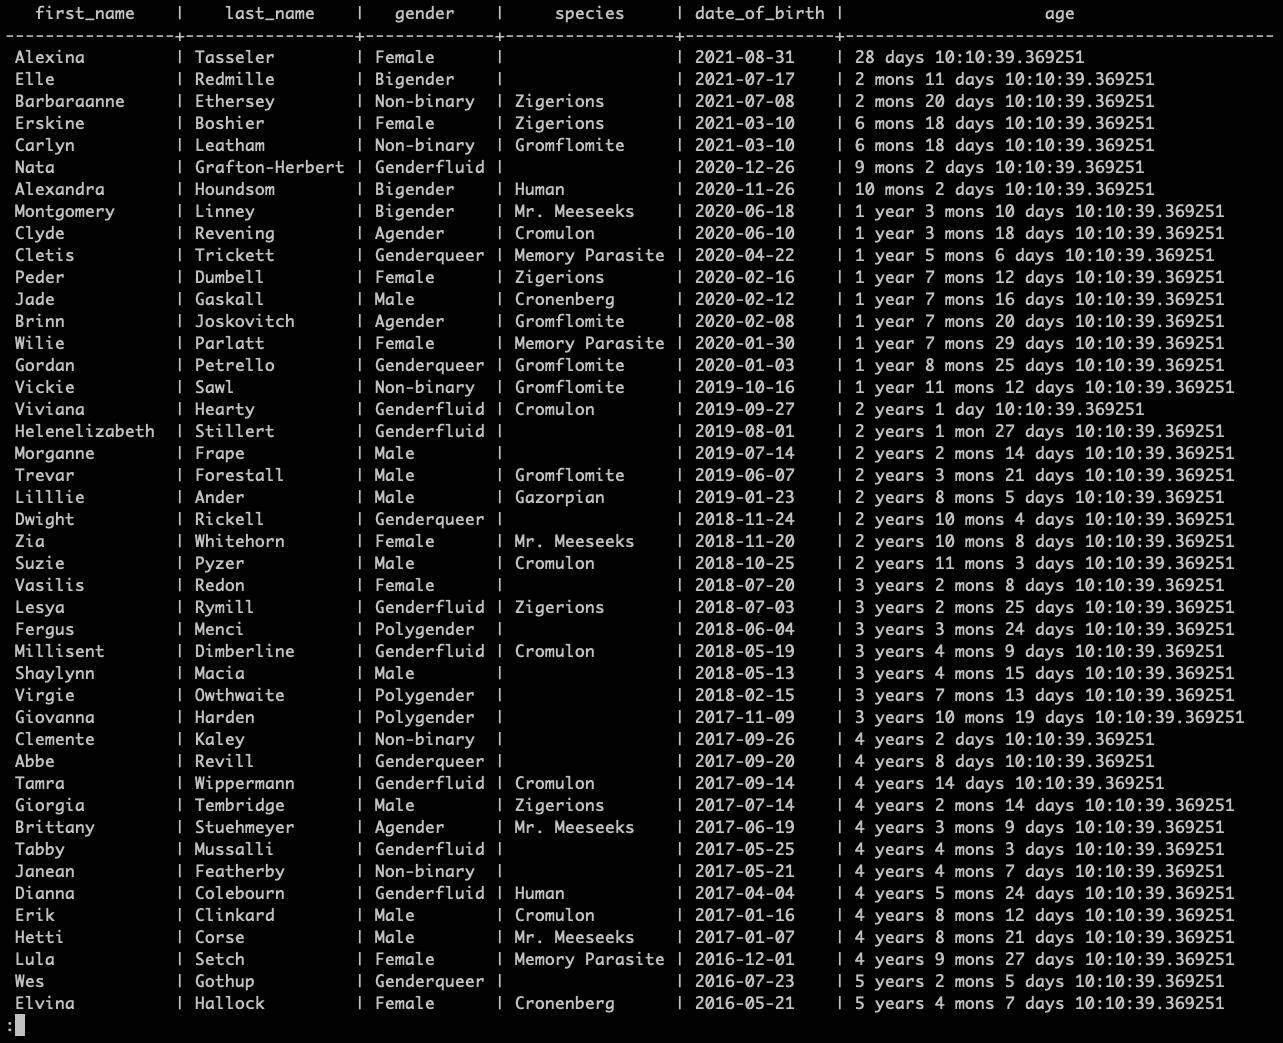
If we want to order our results from youngest alien, just remove the "DESC" keyword ("ASC" is the default "GROUP BY" ordering rule.):
SELECT first_name, last_name, gender, species, date_of_birth, AGE(NOW(), date_of_birth)
FROM alien
ORDER BY age;
Here we can see that our youngest alien is only "28 days old"!
Select data datetime no.4
Primary Keys
A primary key is a "column" or a "group of columns" used to "identify a row uniquely in a table".
We define primary keys through "primary key constraints". Technically, a primary key constraint is the combination of a "not-null" constraint and a "UNIQUE" constraint.
"A table can have one and only one primary key". It is a good practice to add a primary key to every table. When you add a primary key to a table, PostgreSQL creates a unique B-tree index on the column or a group of columns used to define the primary key.
Drop a primary key constraint form an existing primary key syntax:
ALTER TABLE table_name DROP CONSTRAINT constraint_key;
By inspecting the table "alien" with "\d alien", we can see that the table has an "Index": "alien_pkey", which is our "constraint". After dropping the "constraint" and "describing" the table again, the constraint is no longer present.
ALTER TABLE alien
DROP CONSTRAINT alien_pkey;
Constraint example:
c137=# \d alien
                                       Table "public.alien"
    Column     |         Type          | Collation | Nullable |              Default
---------------+-----------------------+-----------+----------+-----------------------------------
 id            | bigint                |           | not null | nextval('alien_id_seq'::regclass)
 first_name    | character varying(50) |           | not null |
 last_name     | character varying(50) |           | not null |
 gender        | character varying(50) |           | not null |
 date_of_birth | date                  |           | not null |
 email         | character varying(50) |           |          |
 species       | character varying(15) |           |          |
Indexes:
    "alien_pkey" PRIMARY KEY, btree (id)

c137=# ALTER TABLE alien DROP CONSTRAINT alien_pkey;
ALTER TABLE
c137=# \d alien
                                       Table "public.alien"
    Column     |         Type          | Collation | Nullable |              Default
---------------+-----------------------+-----------+----------+-----------------------------------
 id            | bigint                |           | not null | nextval('alien_id_seq'::regclass)
 first_name    | character varying(50) |           | not null |
 last_name     | character varying(50) |           | not null |
 gender        | character varying(50) |           | not null |
 date_of_birth | date                  |           | not null |
 email         | character varying(50) |           |          |
 species       | character varying(15) |           |          |
Add primary key to a table column syntax:
ALTER TABLE table_name ADD PRIMARY KEY (id);
By inspecting the table "alien" with "\d alien", we can see that the table has no "indexes". This is because we removed the constraint with the previous command. Add the constraint to the "id" column again and describe the table. You should see the "alien_pkey" again under "Indexes" (same as before it was removed):
ALTER TABLE alien
ADD PRIMARY KEY (id);
Primary key example:
c137=# \d alien
                                       Table "public.alien"
    Column     |         Type          | Collation | Nullable |              Default
---------------+-----------------------+-----------+----------+-----------------------------------
 id            | bigint                |           | not null | nextval('alien_id_seq'::regclass)
 first_name    | character varying(50) |           | not null |
 last_name     | character varying(50) |           | not null |
 gender        | character varying(50) |           | not null |
 date_of_birth | date                  |           | not null |
 email         | character varying(50) |           |          |
 species       | character varying(15) |           |          |

c137=# ALTER TABLE alien ADD PRIMARY KEY (id);
ALTER TABLE
c137=# \d alien
                                       Table "public.alien"
    Column     |         Type          | Collation | Nullable |              Default
---------------+-----------------------+-----------+----------+-----------------------------------
 id            | bigint                |           | not null | nextval('alien_id_seq'::regclass)
 first_name    | character varying(50) |           | not null |
 last_name     | character varying(50) |           | not null |
 gender        | character varying(50) |           | not null |
 date_of_birth | date                  |           | not null |
 email         | character varying(50) |           |          |
 species       | character varying(15) |           |          |
Indexes:
    "alien_pkey" PRIMARY KEY, btree (id)
Delete
Delete everything from a table:
DELETE FROM table_name;
Note: If you wish to test this on the "alien" table, make sure to drop the "alien" table afterwards and then again create it using psql (for data consistency):
DELETE FROM alien;
Note the message "DELETE 1000", which means that the "DELETE" command ran successfully for "1000" rows.
You can then check if the table has any data with select. Here we can see that the table "alien" is still here but it's empty.
Delete example:
c137=# DELETE FROM alien;
DELETE 1000
c137=# \dt
       List of relations
 Schema | Name  | Type  | Owner
--------+-------+-------+-------
 public | alien | table | rick
 public | car   | table | rick
(2 rows)

c137=# \d alien
                                       Table "public.alien"
    Column     |         Type          | Collation | Nullable |              Default
---------------+-----------------------+-----------+----------+-----------------------------------
 id            | bigint                |           | not null | nextval('alien_id_seq'::regclass)
 first_name    | character varying(50) |           | not null |
 last_name     | character varying(50) |           | not null |
 gender        | character varying(50) |           | not null |
 date_of_birth | date                  |           | not null |
 email         | character varying(50) |           |          |
 species       | character varying(15) |           |          |
Indexes:
    "alien_pkey" PRIMARY KEY, btree (id)

c137=# SELECT * FROM alien;
 id | first_name | last_name | gender | date_of_birth | email | species
----+------------+-----------+--------+---------------+-------+---------
(0 rows)
Let's drop the table:
DROP TABLE alien;
And re-create it:
\i <path_to_your_dir>/alien.sql
Delete from a table where chosen columns have specific values:
DELETE FROM table_name
WHERE column_name = 'Value';
Try it out on the table "alien".
Delete all rows whose "species" column is null:
DELETE FROM alien
WHERE species IS NULL;
Note that we got the message "DELETE n" where "n" is the number of rows deleted, and that we no longer have rows (aliens) without "species" column value.
Delete all rows whose "gender" column is equal to "Polygender":
DELETE FROM alien
WHERE gender = 'Polygender';
Note that we got the message "DELETE n" where "n" is the number of rows deleted, and that we no longer have rows (aliens) with "gender" value of "Polygender".
Important: It is recommended that you drop the table "alien" again and recreate it.
Delete example 2
Unique Constraints
Add a constraint:
ALTER table_name ADD CONSTRAINT constraint_name UNIQUE (column_name);
With default constraint name:
ALTER table_name ADD UNIQUE (column_name);
In the table "alien":
ALTER TABLE alien
ADD CONSTRAINT email_constraint
UNIQUE (email);
Note that the "ALTER TABLE" message after the command means that the command executed successfully.
Unique constraint example:
c137=# ALTER TABLE alien ADD CONSTRAINT email_constraint UNIQUE (email);
ALTER TABLE
c137=# \d alien
                                       Table "public.alien"
    Column     |         Type          | Collation | Nullable |              Default
---------------+-----------------------+-----------+----------+-----------------------------------
 id            | bigint                |           | not null | nextval('alien_id_seq'::regclass)
 first_name    | character varying(50) |           | not null |
 last_name     | character varying(50) |           | not null |
 gender        | character varying(50) |           | not null |
 date_of_birth | date                  |           | not null |
 email         | character varying(50) |           |          |
 species       | character varying(15) |           |          |
Indexes:
    "alien_pkey" PRIMARY KEY, btree (id)
    "email_constraint" UNIQUE CONSTRAINT, btree (email)
With default constraint name:
ALTER TABLE alien
ADD UNIQUE (email);
Note the format the constraint key is in if we let the postgres name it: "<TABLE>_<COLUMN>_key", in this case "alien_email_key".
ALTER TABLE table_name DROP CONSTRAINT constraint_name;
In the table "alien" (depending on which command you ran, provide the email constraint key here... it should be either "email_constraint" or "alien_email_key")
Unique constraint example 2:
c137=# ALTER TABLE alien
ADD UNIQUE (email);
ALTER TABLE
c137=# \d alien
                                       Table "public.alien"
    Column     |         Type          | Collation | Nullable |              Default
---------------+-----------------------+-----------+----------+-----------------------------------
 id            | bigint                |           | not null | nextval('alien_id_seq'::regclass)
 first_name    | character varying(50) |           | not null |
 last_name     | character varying(50) |           | not null |
 gender        | character varying(50) |           | not null |
 date_of_birth | date                  |           | not null |
 email         | character varying(50) |           |          |
 species       | character varying(15) |           |          |
Indexes:
    "alien_pkey" PRIMARY KEY, btree (id)
    "alien_email_key" UNIQUE CONSTRAINT, btree (email)
    "email_constraint" UNIQUE CONSTRAINT, btree (email)
Drop the constraint on the "email" column in the "alien" table:
ALTER TABLE alien DROP CONSTRAINT alien_email_key;
Depending on your constraint name, the constraint should now be removed from the table.
Unique constraint example 3:
c137=# ALTER TABLE alien DROP CONSTRAINT alien_email_key;
ALTER TABLE
c137=# \d alien
                                       Table "public.alien"
    Column     |         Type          | Collation | Nullable |              Default
---------------+-----------------------+-----------+----------+-----------------------------------
 id            | bigint                |           | not null | nextval('alien_id_seq'::regclass)
 first_name    | character varying(50) |           | not null |
 last_name     | character varying(50) |           | not null |
 gender        | character varying(50) |           | not null |
 date_of_birth | date                  |           | not null |
 email         | character varying(50) |           |          |
 species       | character varying(15) |           |          |
Indexes:
    "alien_pkey" PRIMARY KEY, btree (id)
Check constraints
Add a constraint based on a condition:
ALTER TABLE table_name ADD CONSTRAINT constraint_name CHECK (condition);
We can alter the table "car" by adding a "check constraint" on "price" by checking if it is greater than "10 000".
If we inspect the "car" table we can see that the price is of type "numeric(19, 2)" (19 - digit number; fixed precision, 2 - rounded to 2 decimal places; The number of decimal digits that are stored to the right of the decimal point). That means at this moment we can enter a row with a price as low as "13.99". Pretty low price for a car...
INSERT INTO car (model, make, price)
VALUES ('Jotun', 'Toaster', '13.99');
Check constraint example:
c137=# \d
            List of relations
 Schema |     Name     |   Type   | Owner
--------+--------------+----------+-------
 public | alien        | table    | rick
 public | alien_id_seq | sequence | rick
 public | car          | table    | rick
 public | car_id_seq   | sequence | rick
(4 rows)

c137=# \d car
                                   Table "public.car"
 Column |         Type          | Collation | Nullable |             Default
--------+-----------------------+-----------+----------+---------------------------------
 id     | bigint                |           | not null | nextval('car_id_seq'::regclass)
 make   | character varying(50) |           | not null |
 model  | character varying(50) |           | not null |
 price  | numeric(19,2)         |           |          |
Indexes:
    "car_pkey" PRIMARY KEY, btree (id)
c137=# INSERT INTO car (model, make, price) VALUES ('Jotun', 'Toaster', '13.99');
INSERT 0 1
c137=# SELECT * FROM car WHERE id > 1000;
  id  |  make   | model | price
------+---------+-------+-------
 1001 | Toaster | Jotun | 13.99
(1 row)
Add a check constraint on the price column that says we cannot enter a price below "10 000":
ALTER TABLE car
ADD CONSTRAINT price_constraint
CHECK (price > 10000);
This will, in our case, return an "error" saying that some of "existing column price values violate this constraint". This is because we just inserted a "row" with a price of "13.99".
Check constraint example 2:
c137=# ALTER TABLE car
ADD CONSTRAINT price_constraint
CHECK (price > 10000);
ERROR:  check constraint "price_constraint" of relation "car" is violated by some row
Since we know the "id" of the newly created "row" is "1001", we can delete it:
DELETE FROM car
WHERE id = 1001;
Check constraint example 3:
c137=# DELETE FROM car WHERE id = 1001;
DELETE 1
Then we can add the check constraint:
ALTER TABLE car
ADD CONSTRAINT price_constraint
CHECK (price > 10000);
Note: postgres automatically added a "type conversion" from our "CHECK" condition to a "numeric" value on the newly created "price_constraint".
Check constraint example 4:
c137=# ALTER TABLE car
ADD CONSTRAINT price_constraint
CHECK (price > 10000);
ALTER TABLE
c137=# \d car
                                   Table "public.car"
 Column |         Type          | Collation | Nullable |             Default
--------+-----------------------+-----------+----------+---------------------------------
 id     | bigint                |           | not null | nextval('car_id_seq'::regclass)
 make   | character varying(50) |           | not null |
 model  | character varying(50) |           | not null |
 price  | numeric(19,2)         |           |          |
Indexes:
    "car_pkey" PRIMARY KEY, btree (id)
Check constraints:
    "price_constraint" CHECK (price > 10000::numeric)
Now we can see that by "trying to insert a row with a price of value below or equal to 10 000" will return an "error" saying that the new row for relation "car" violates check constraint "price_constraint".
Check constraint example 5:
c137=# INSERT INTO car (model, make, price) VALUES ('Jotun', 'Toaster', '13.99');
ERROR:  new row for relation "car" violates check constraint "price_constraint"
DETAIL:  Failing row contains (1002, Toaster, Jotun, 13.99).
c137=# INSERT INTO car (model, make, price) VALUES ('Jotun', 'Toaster', '10000');
ERROR:  new row for relation "car" violates check constraint "price_constraint"
DETAIL:  Failing row contains (1003, Toaster, Jotun, 10000.00).
We can insert a row with a price greater than "10 000":
INSERT INTO car (model, make, price)
VALUES ('Jotun', 'Toaster', '13500.00’)
Note that we can select all of our newly (or manually) added rows if we used the "car.sql" file to create the table, by adding a "WHERE id > 1000" condition in the select command. Also note that our new row's "id" is "1004" and this is the "BIGSERIAL" data type increments its "BIGINT" counter every time it is "invoked", even if the "operation failed".
Since we deleted a row with "id" "1001" and we failed to insert 2 rows, the "BIGSERIAL's" counter was incremented to "1002" and "1003" respectively. After the final insert, the "id" of the new row is "1004". More on this on [Serial & Sequences](link here).
Check constraint example 6:
c137=# INSERT INTO car (model, make, price) VALUES ('Jotun', 'Toaster', '13500.00');
INSERT 0 1
c137=# SELECT * FROM car WHERE id > 1000;
  id  |  make   | model |  price
------+---------+-------+----------
 1004 | Toaster | Jotun | 13500.00
(1 row)
Update
Update an entry using “UPDATE” and "WHERE" keyword syntax:
UPDATE table_name SET column_name = 'Value' WHERE column_name = 'Value';
Update multiple columns:
UPDATE table_name SET column1 = 'Value_1', column2 = 'Value_2' WHERE column_name = 'Value';
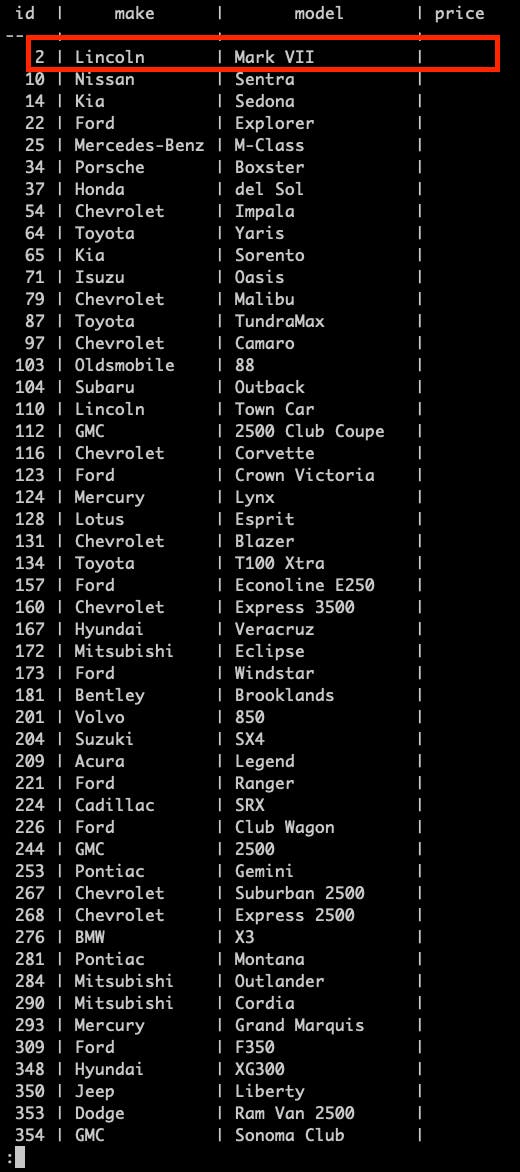
Update a "car" row where a "price" is lower than "10 000" (to check the previously added constraint).
First, let's find a rows that meet our criteria and take the first one available:
SELECT * FROM car
WHERE price IS NULL;
Update data example
In this case it is the row with "id" "2". Attempt to update it to a price of "13.99":
UPDATE car
SET price = '13.99'
WHERE id = 2;
Update data example 2:
c137=# UPDATE car SET price = '13.99' WHERE id = 2;
ERROR:  new row for relation "car" violates check constraint "price_constraint"
DETAIL:  Failing row contains (2, Lincoln, Mark VII, 13.99).
And we will get an "error" saying our "price violates the price_constraint" we defined above. Update properly now:
UPDATE car
SET price = '167800.25'
WHERE id = 2;
Update data example 3:
c137=# UPDATE car SET price = '167800.25' WHERE id = 2;
UPDATE 1
c137=# SELECT * FROM car WHERE id = 2;
 id |  make   |  model   |   price
----+---------+----------+-----------
  2 | Lincoln | Mark VII | 167800.25
(1 row)
Here is an example of updating multiple row values:
UPDATE car
SET price = '199999.99', make = 'Rick'
WHERE id = 2;
Update data example 4:
c137=# UPDATE car
SET price = '199999.99', make = 'Rick'
WHERE id = 2;
UPDATE 1
c137=# SELECT * FROM car WHERE id = 2;
 id | make |  model   |   price
----+------+----------+-----------
  2 | Rick | Mark VII | 199999.99
(1 row)
On conflict do nothing
Handle "errors" \ "exceptions" \ "conflicts", example: inserting a table row with a duplicate column value in a unique column.
Use "ON CONFLICT" only on "columns" that have a "constraint". Syntax:
INSERT INTO table_name (column1, column2) VALUES (val1, val2)
ON CONFLICT (column) DO NOTHING;
Here is an example: Alter the table "alien" to have a "UNIQUE" "constraint" called "email_constraint" on column "email":
ALTER TABLE alien
ADD CONSTRAINT email_constraint UNIQUE(email);
On conflict example:
c137=# ALTER TABLE alien ADD CONSTRAINT email_constraint UNIQUE(email);
ALTER TABLE
c137=# \d alien
                                       Table "public.alien"
    Column     |         Type          | Collation | Nullable |              Default
---------------+-----------------------+-----------+----------+-----------------------------------
 id            | bigint                |           | not null | nextval('alien_id_seq'::regclass)
 first_name    | character varying(50) |           | not null |
 last_name     | character varying(50) |           | not null |
 gender        | character varying(50) |           | not null |
 date_of_birth | date                  |           | not null |
 email         | character varying(50) |           |          |
 species       | character varying(15) |           |          |
Indexes:
    "alien_pkey" PRIMARY KEY, btree (id)
    "email_constraint" UNIQUE CONSTRAINT, btree (email)
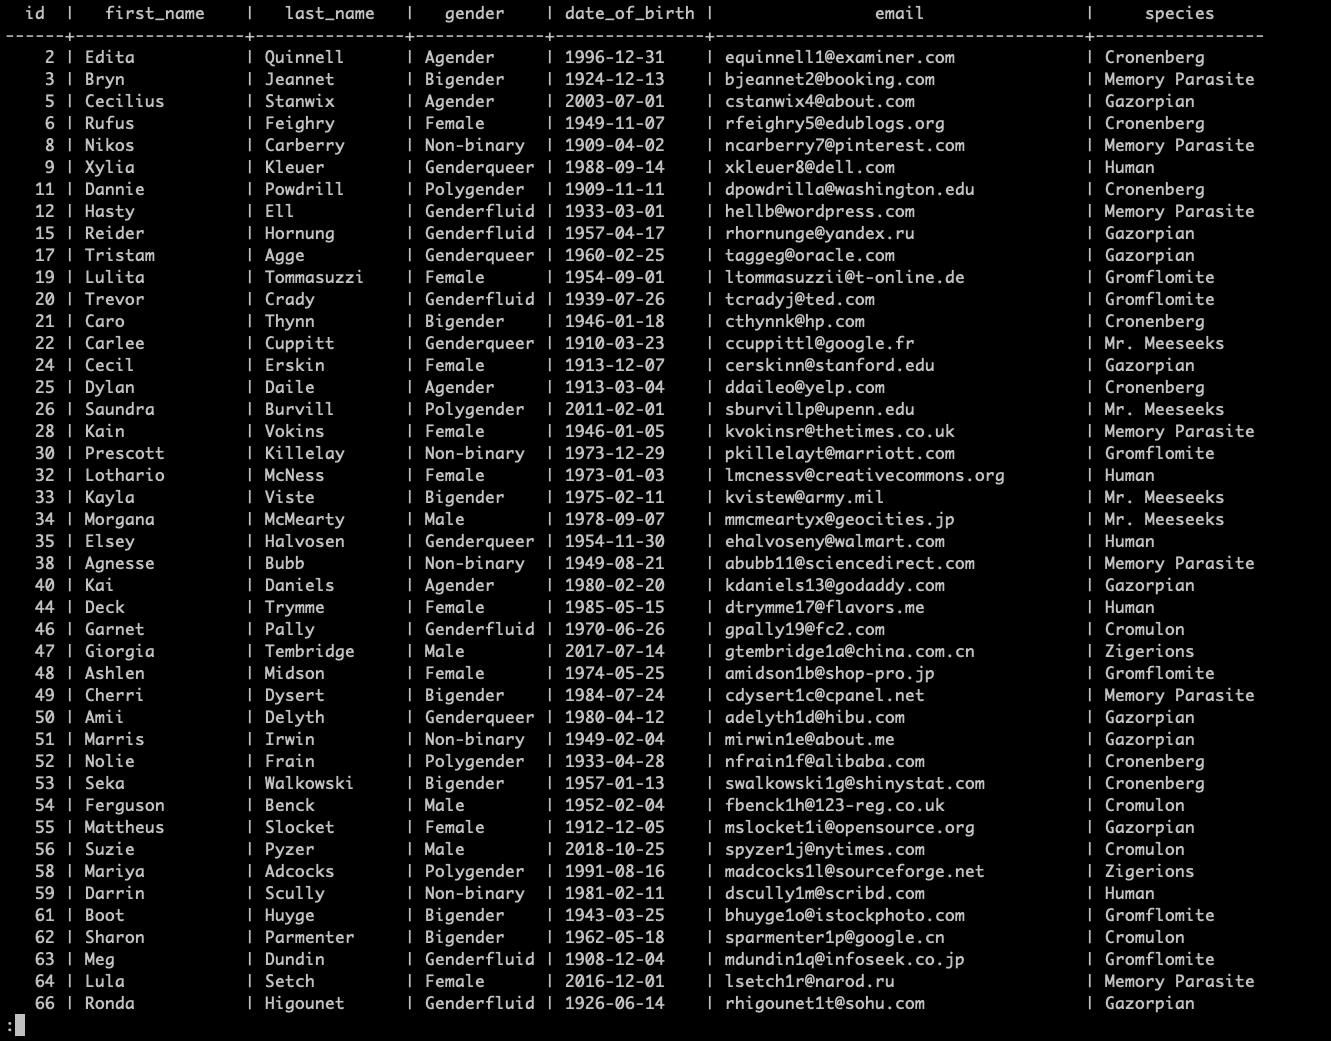
Then "insert a row with an email that already exists". Find one first by getting every row that has an email (or email is not null), in this case row with "id = 2" has an email: "[email protected]":
SELECT * FROM alien
WHERE email IS NOT NULL;
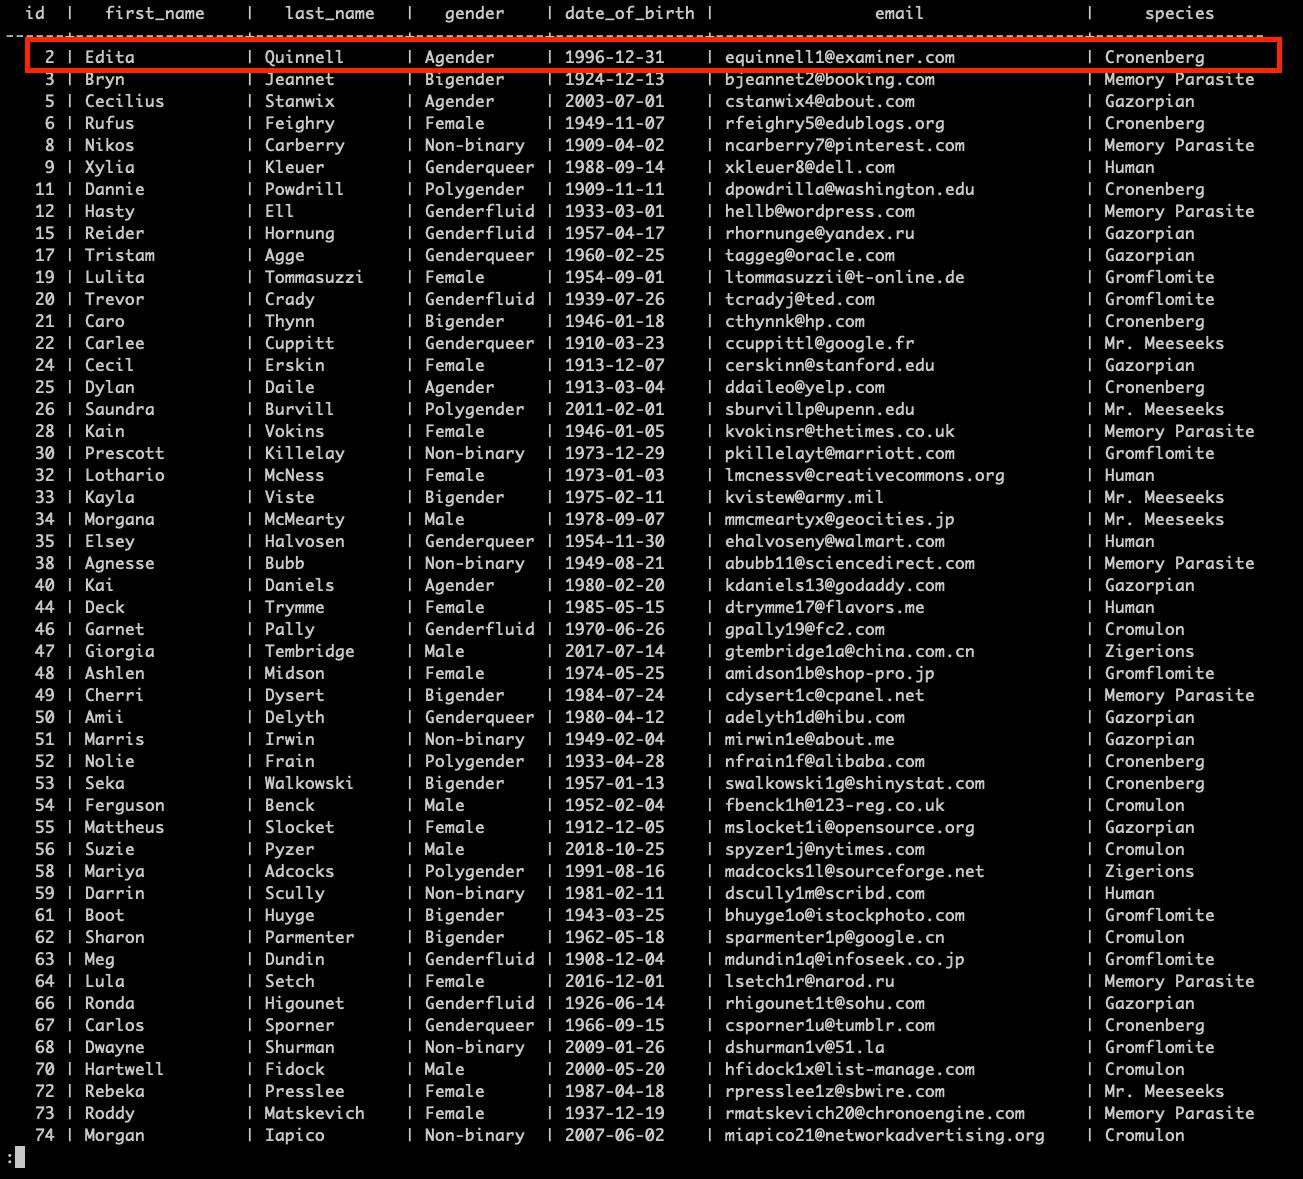
If we attempt to insert a row with the existing email "[email protected]", we will get an error that our new row violates the "email_constraint":
INSERT INTO alien (
  first_name, last_name, gender, date_of_birth, email, species
) VALUES (
  'Squnky', 'Swash', 'Omegagender', '1548-08-25', '[email protected]', 'Memory Parasite'
);
On conflict example 3:
c137=# INSERT INTO alien (
  first_name, last_name, gender, date_of_birth, email, species
) VALUES (
  'Squnky', 'Swash', 'Omegagender', '1548-08-25', '[email protected]', 'Memory Parasite'
);
ERROR:  duplicate key value violates unique constraint "email_constraint"
DETAIL:  Key (email)=([email protected]) already exists
If we add the "ON CONFLICT" keyword, we do not get an "error", rather an "INSERT 0 0" message, meaning the insert failed ("gracefully"):
INSERT INTO alien (
  first_name, last_name, gender, date_of_birth, email, species
) VALUES (
  'Squnky', 'Swash', 'Omegagender', '1548-08-25', '[email protected]', 'Memory Parasite'
) ON CONFLICT (email) DO NOTHING;
On conflict example 4:
c137=# INSERT INTO alien (
  first_name, last_name, gender, date_of_birth, email, species
) VALUES (
  'Squnky', 'Swash', 'Omegagender', '1548-08-25', '[email protected]', 'Memory Parasite'
) ON CONFLICT (email) DO NOTHING;
INSERT 0 0
Foreign keys, joins and relationships
We can alter our alien table, adding a column "car_id" that references the table car's "id" column - "Foreign Key".
ALTER TABLE alien
ADD COLUMN car_id
BIGINT REFERENCES car(id);
Foreign key example:
c137=# ALTER TABLE alien ADD COLUMN car_id BIGINT REFERENCES car(id);
ALTER TABLE
c137=# \d car
                                   Table "public.car"
 Column |         Type          | Collation | Nullable |             Default
--------+-----------------------+-----------+----------+---------------------------------
 id     | bigint                |           | not null | nextval('car_id_seq'::regclass)
 make   | character varying(50) |           | not null |
 model  | character varying(50) |           | not null |
 price  | numeric(19,2)         |           |          |
Indexes:
    "car_pkey" PRIMARY KEY, btree (id)
Check constraints:
    "price_constraint" CHECK (price > 10000::numeric)
Referenced by:
    TABLE "alien" CONSTRAINT "alien_car_id_fkey" FOREIGN KEY (car_id) REFERENCES car(id)
Make the "car_id" column unique, meaning only each alien can have only one car at a time:
ALTER TABLE alien
ADD CONSTRAINT unique_car_id UNIQUE(car_id);
Foreign key example 2:
c137=# ALTER TABLE alien ADD CONSTRAINT unique_car_id UNIQUE(car_id);
ALTER TABLE
c137=# \d alien
                                       Table "public.alien"
    Column     |         Type          | Collation | Nullable |              Default
---------------+-----------------------+-----------+----------+-----------------------------------
 id            | bigint                |           | not null | nextval('alien_id_seq'::regclass)
 first_name    | character varying(50) |           | not null |
 last_name     | character varying(50) |           | not null |
 gender        | character varying(50) |           | not null |
 date_of_birth | date                  |           | not null |
 email         | character varying(50) |           |          |
 species       | character varying(15) |           |          |
 car_id        | bigint                |           |          |
Indexes:
    "alien_pkey" PRIMARY KEY, btree (id)
    "email_constraint" UNIQUE CONSTRAINT, btree (email)
    "unique_car_id" UNIQUE CONSTRAINT, btree (car_id)
Foreign-key constraints:
    "alien_car_id_fkey" FOREIGN KEY (car_id) REFERENCES car(id)
Assign a "car" to an "alien" by updating the alien table row's "car_id" value to match the id of the row from the car table (do that a few times):
UPDATE alien
SET car_id = 1
WHERE id = 1;
UPDATE alien
SET car_id = 3
WHERE id = 2;
UPDATE alien
SET car_id = 10
WHERE id = 5;
Check it out (selecting only the 3 "alien" table rows that we affected, you can list all rows if you want.):
SELECT * FROM alien
WHERE id IN (1, 2, 5);
Foreign key example 3:
c137=# SELECT * FROM alien WHERE id IN (1, 2, 5);
 id | first_name | last_name | gender  | date_of_birth |          email          |  species   | car_id
----+------------+-----------+---------+---------------+-------------------------+------------+--------
  1 | Adelind    | Sagg      | Male    | 1993-09-30    |                         |            |      1
  2 | Edita      | Quinnell  | Agender | 1996-12-31    | [email protected] | Cronenberg |      3
  5 | Cecilius   | Stanwix   | Agender | 2003-07-01    | [email protected]     | Gazorpian  |     10
(3 rows)
Inner join
The "INNER JOIN" selects rows that have matching values in both tables. Syntax:
SELECT column_name(s)
FROM table1
INNER JOIN table2
ON table1.column_name = table2.column_name;
This example selects all "aliens" that have a "car" ("car_id" assigned):
SELECT * FROM alien
JOIN car ON alien.car_id = car.id;
Note: The "INNER JOIN" selects all rows from both tables as long as there is a match between the columns. If there are rows in the table "alien" that do not have matches in the table "car", these rows will not be shown!
Here is an extra example where we select only certain columns:
SELECT alien.first_name, car.make, car.model, car.price FROM alien
JOIN car ON alien.car_id = car.id;
Inner join example:
c137=# SELECT * FROM alien JOIN car ON alien.car_id = car.id;
 id | first_name | last_name | gender  | date_of_birth |          email          |  species   | car_id | id |  make  | model  |  price
----+------------+-----------+---------+---------------+-------------------------+------------+--------+----+--------+--------+----------
  5 | Cecilius   | Stanwix   | Agender | 2003-07-01    | [email protected]     | Gazorpian  |     10 | 10 | Nissan | Sentra |
  1 | Adelind    | Sagg      | Male    | 1993-09-30    |                         |            |      1 |  1 | Honda  | CR-Z   | 27728.48
  2 | Edita      | Quinnell  | Agender | 1996-12-31    | [email protected] | Cronenberg |      3 |  3 | Lexus  | SC     | 19231.39
(3 rows)
Left join
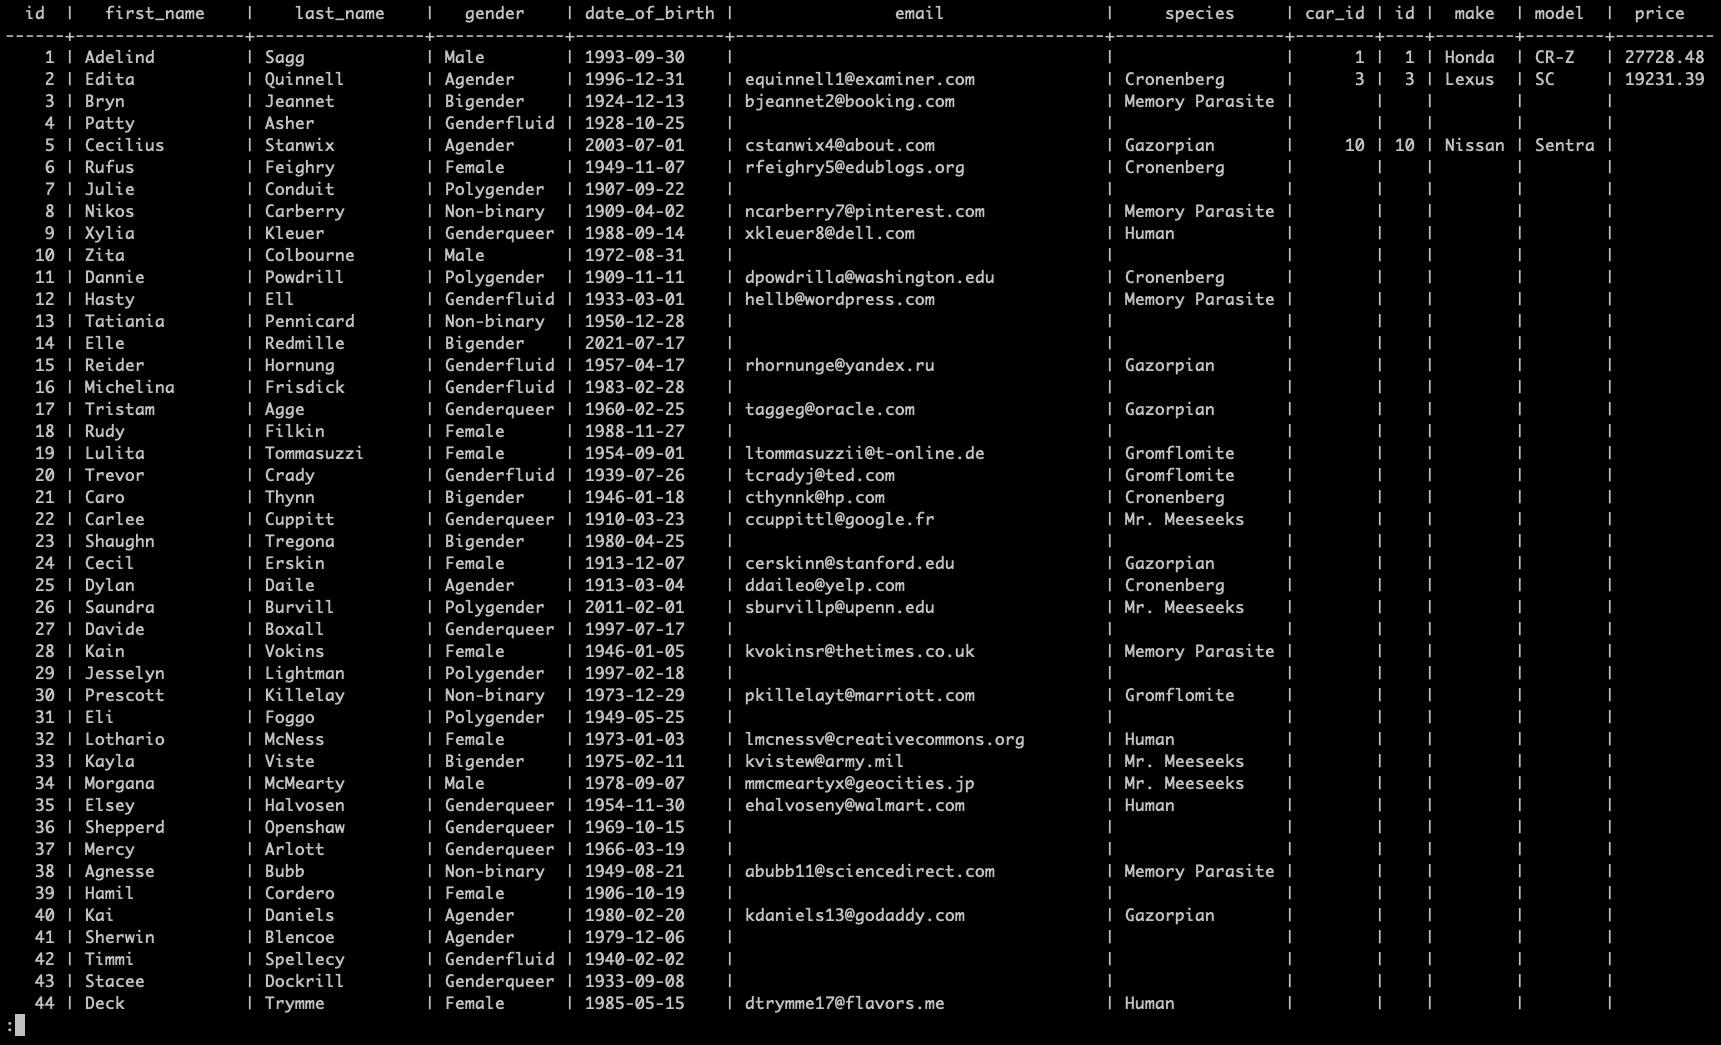
The "LEFT JOIN" returns all records from the left table (table1), and the matching records from the right table (table2). The result is 0 records from the right side, if there is no match.
Combine 2 tables (like in an inner join), the result contains all of the rows from table 1 (LEFT TABLE) and only the rows from table 2 (RIGHT TABLE) that have a corresponding relationship.
This includes everyone that has a car and those aliens that do not have a car.
SELECT * FROM alien
LEFT JOIN car ON alien.car_id = car.id
ORDER BY alien.id;
We can see that we got all of the "alien" rows (left table) joined with their "car" that have a corresponding "car_id".
Left join example
Right join
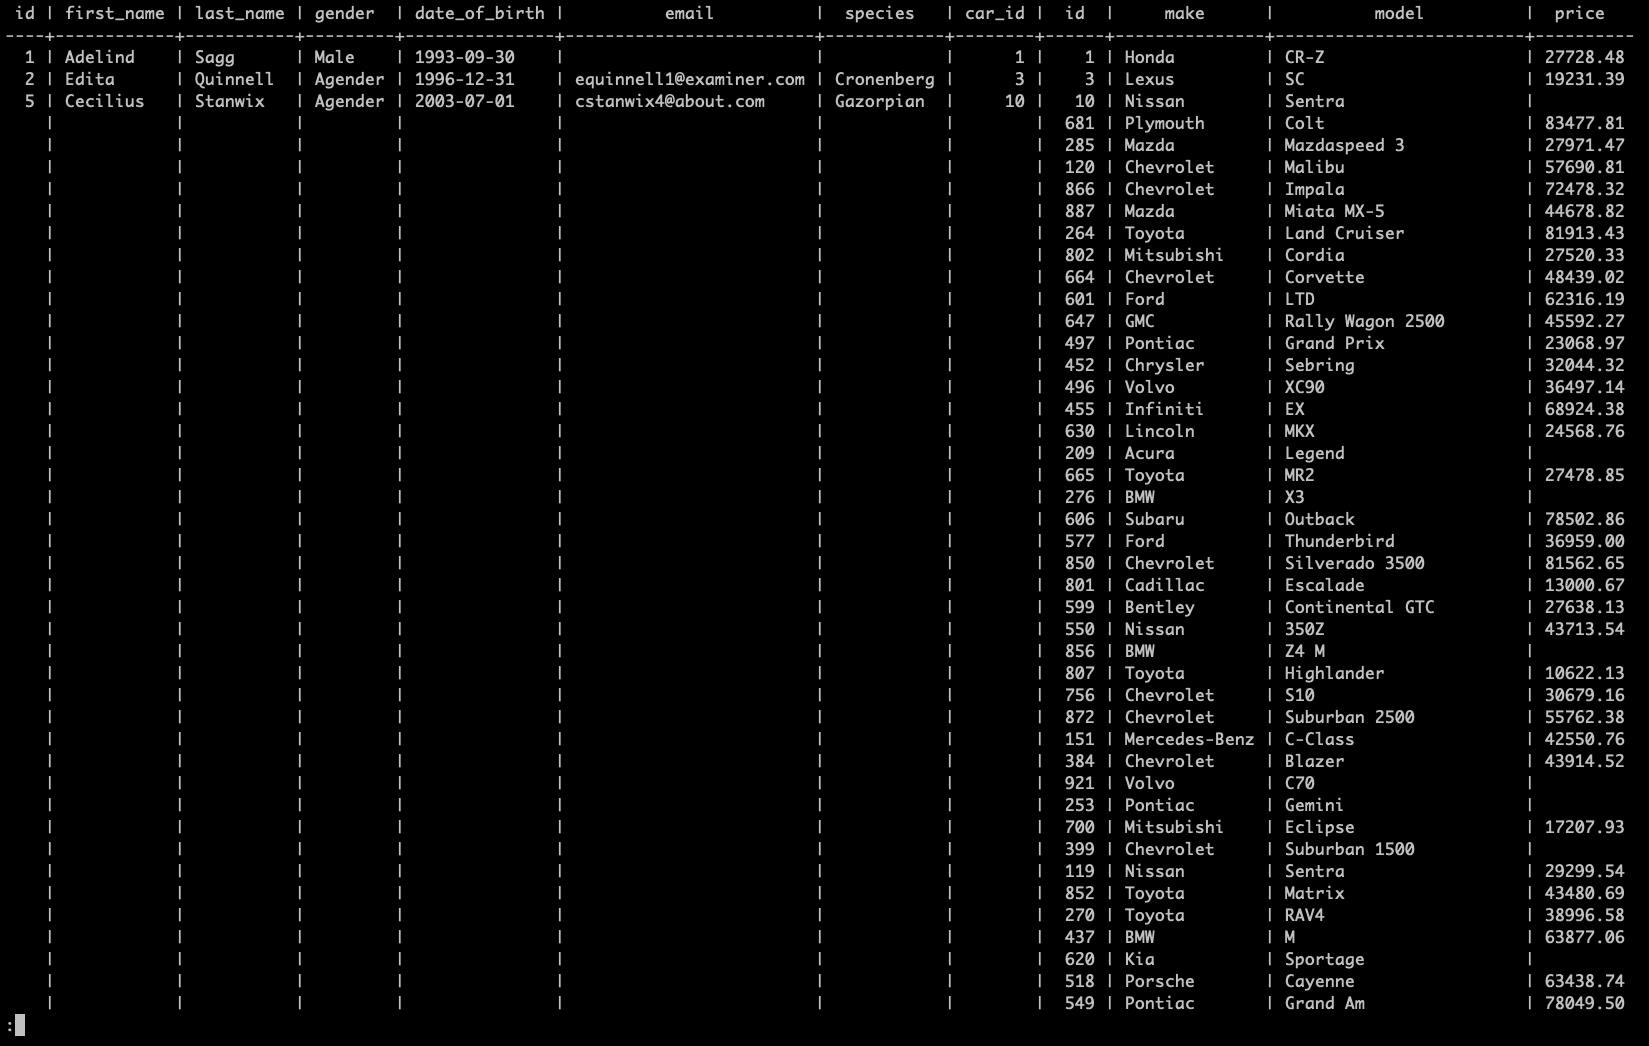
The "RIGHT JOIN" returns all rows from the "right" table (table2), and the matching rows from the "left" table (table1). The result is 0 rows from the left side, if there is no match. Syntax:
SELECT column_name(s)
FROM table1
RIGHT JOIN table2
ON table1.column_name = table2.column_name;
Note: In some databases “RIGHT JOIN" is called "RIGHT OUTER JOIN".
Example right join between "alien" and "car" tables:
SELECT * FROM alien
RIGHT JOIN car
ON alien.car_id = car.id.
We can see that we got all of the "car" rows (right table) joined with their "alien" owners that have a corresponding "car_id".
Right join example
Full join
The "FULL OUTER JOIN" keyword returns all rows when there is a match in left (table1) or right (table2) table rows.
Note: "FULL OUTER JOIN" and "FULL JOIN" are the same.
Note: "FULL OUTER JOIN" can potentially return very large result-sets! Syntax:
SELECT column_name(s)
FROM table1
FULL OUTER JOIN table2
ON table1.column_name = table2.column_name
WHERE condition;
Full join on "alien" and "car" tables:
SELECT *
FROM alien
FULL OUTER JOIN car
ON alien.car_id = car.id
ORDER BY alien.id;
Note: The "FULL OUTER JOIN" returns "all matching records from both tables whether the other table matches or not". So, if there are rows in "alien" that do not have matches in "car", or if there are rows in "car" that do not have matches in "alien", those rows will be listed as well.
Deleting records with foreign keys
Deleting an entry that is referenced from another table will return an error.
You need to remove the foreign key constraint from the related table first.
Export query results to a file
Export query results to a file, set delimiter, set type as "csv", include headers.
\copy (
  SELECT * FROM alien
  LEFT JOIN car ON car.id = alien.car_id
  ORDER BY alien.id
) TO '/Users/username/Desktop/results.csv'
DELIMITER ',' CSV HEADER;
The message "COPY 1000" means that the 1000 results generated have been copied to the destination file.
Export query results example:
c137=#
\copy (
  SELECT * FROM alien
  LEFT JOIN car ON car.id = alien.car_id
  ORDER BY alien.id
) TO '/Users/username/Desktop/results.csv'
DELIMITER ',' CSV HEADER;
COPY 1000
c137=#
Serial and Sequences
Inspect a "BIGSERIAL" sequence table. The table was automatically created when the table "alien" was created:
SELECT * FROM alien_id_seq;
Serial / Sequence example:
c137=# \d
            List of relations
 Schema |     Name     |   Type   | Owner
--------+--------------+----------+-------
 public | alien        | table    | rick
 public | alien_id_seq | sequence | rick
 public | car          | table    | rick
 public | car_id_seq   | sequence | rick
(4 rows)

c137=# SELECT * FROM alien_id_seq;
 last_value | log_cnt | is_called
------------+---------+-----------
       1002 |      23 | t
(1 row)
Here we can see that the BIGSERIAL’s "id" column's last value was "1000", its log count and is it called.
Select the next val from the BIGSERIAL's sequence. This consumes the function and auto-increments the number.
SELECT nextval('alien_id_seq'::regclass);Serial / Sequence example 2:
c137=# SELECT nextval('alien_id_seq'::regclass);
 nextval
---------
    1001
(1 row)
Restart the sequence with a given value:
ALTER SEQUENCE alien_id_seq
RESTART WITH 10;
Serial / Sequence example 3:
c137=# ALTER SEQUENCE alien_id_seq
RESTART WITH 10;
ALTER SEQUENCE
c137=# SELECT * FROM alien_id_seq;
 last_value | log_cnt | is_called
------------+---------+-----------
         10 |       0 | f
(1 row)
Extensions
List all available extensions:
SELECT * FROM pg_available_extensions;
Install an extension:
CREATE EXTENSION if NOT EXISTS 'extension_name';
Install the "uuid-ossp" extension:
CREATE EXTENSION if NOT EXISTS "uuid-ossp";
"\df" - list all available functions.
Extensions example:
c137=# \df
                                 List of functions
 Schema |        Name        | Result data type |    Argument data types    | Type
--------+--------------------+------------------+---------------------------+------
 public | uuid_generate_v1   | uuid             |                           | func
 public | uuid_generate_v1mc | uuid             |                           | func
 public | uuid_generate_v3   | uuid             | namespace uuid, name text | func
 public | uuid_generate_v4   | uuid             |                           | func
 public | uuid_generate_v5   | uuid             | namespace uuid, name text | func
 public | uuid_nil           | uuid             |                           | func
 public | uuid_ns_dns        | uuid             |                           | func
 public | uuid_ns_oid        | uuid             |                           | func
 public | uuid_ns_url        | uuid             |                           | func
 public | uuid_ns_x500       | uuid             |                           | func
(10 rows)
UUID
Generate universally unique identifier (uuid; uuid4 in this case):
SELECT uuid_generate_v4();
UUID example:
c137=# SELECT uuid_generate_v4();
           uuid_generate_v4
--------------------------------------
 75d1ac92-561a-4f20-92cd-e4547e7f33f3
(1 row)
UUID as primary key
We can use uuid(s) as primary keys. Example table definitions are below (Drop the existing tables or rename them to test this). Note that we first must "create a car table before creating the alien table because the alien table references the car table":
CREATE TABLE car (
car_uid             UUID             NOT NULL PRIMARY KEY,
make                VARCHAR(100)     NOT NULL,
model                 VARCHAR(100)     NOT NULL,
price                 NUMERIC(19, 2)     NOT NULL CHECK (price > 0)
);

CREATE TABLE alien (
alien_uid             UUID             NOT NULL PRIMARY KEY,
first_name             VARCHAR(50)     NOT NULL,
last_name             VARCHAR(50)        NOT NULL,
gender             VARCHAR(50)     NOT NULL,
date_of_birth             DATE             NOT NULL,
email                 VARCHAR(150),
species             VARCHAR(100),
car_uid            UUID             REFERENCES car(car_uid),
UNIQUE(car_uid),
UNIQUE(email)
);
UUID as primary key example:
c137=# CREATE TABLE car (
car_uid                         UUID                    NOT NULL PRIMARY KEY,
make                            VARCHAR(100)    NOT NULL,
model                           VARCHAR(100)    NOT NULL,
price                           NUMERIC(19, 2)  NOT NULL CHECK (price > 0)
);

CREATE TABLE alien (
alien_uid                       UUID                    NOT NULL PRIMARY KEY,
first_name                      VARCHAR(50)     NOT NULL,
last_name                       VARCHAR(50)             NOT NULL,
gender                  VARCHAR(50)     NOT NULL,
date_of_birth                   DATE                    NOT NULL,
email                           VARCHAR(150),
species                         VARCHAR(100),
car_uid                 UUID                    REFERENCES car(car_uid),
UNIQUE(car_uid),
UNIQUE(email)
);
CREATE TABLE
CREATE TABLE
Insert values. Note that you must manually generate uuids. After that, inspect the tables.
INSERT INTO alien (
  alien_uid, first_name, last_name, gender, email, date_of_birth, species
) VALUES (
  uuid_generate_v4(), 'Jessica', 'Smith', 'Female', '[email protected]', '1999-12-02', 'Human'
);

INSERT INTO alien (
  alien_uid, first_name, last_name, gender, email, date_of_birth, species
) VALUES (
  uuid_generate_v4(), 'John', 'Doe', 'Male', '[email protected]', '1978-05-09', 'Human'
);

INSERT INTO alien (
  alien_uid, first_name, last_name, gender, email, date_of_birth, species
) VALUES (
  uuid_generate_v4(), 'Noob', 'Noob', 'Male', '[email protected]', '2012-11-11', '???'
);

INSERT INTO car (
  car_uid, make, model, price
) VALUES (
  uuid_generate_v4(), 'Jotun', 'Toaster', '13500'
);

INSERT INTO car (
  car_uid, make, model, price
) VALUES (
  uuid_generate_v4(), 'DMT', 'Toaster', '56500'
);

INSERT INTO car (
  car_uid, make, model, price
) VALUES (
  uuid_generate_v4(), 'Plumbuss', 'Future', '104000'
);
UUID as primary key example 2:
c137=# INSERT INTO alien (
  alien_uid, first_name, last_name, gender, email, date_of_birth, species
) VALUES (
  uuid_generate_v4(), 'Jessica', 'Smith', 'Female', '[email protected]', '1999-12-02', 'Human'
);

INSERT INTO alien (
  alien_uid, first_name, last_name, gender, email, date_of_birth, species
) VALUES (
  uuid_generate_v4(), 'John', 'Doe', 'Male', '[email protected]', '1978-05-09', 'Human'
);

INSERT INTO alien (
  alien_uid, first_name, last_name, gender, email, date_of_birth, species
) VALUES (
  uuid_generate_v4(), 'Noob', 'Noob', 'Male', '[email protected]', '2012-11-11', '???'
);

INSERT INTO car (
  car_uid, make, model, price
) VALUES (
  uuid_generate_v4(), 'Jotun', 'Toaster', '13500'
);

INSERT INTO car (
  car_uid, make, model, price
) VALUES (
  uuid_generate_v4(), 'DMT', 'Toaster', '56500'
);

INSERT INTO car (
  car_uid, make, model, price
) VALUES (
  uuid_generate_v4(), 'Plumbuss', 'Future', '104000'
);
INSERT 0 1
INSERT 0 1
INSERT 0 1
INSERT 0 1
INSERT 0 1
INSERT 0 1
Update the table "alien" with "car_uid" values from the table "car" (Assign a car to an alien):
UPDATE alien SET car_uid = <YOUR_CAR_UUID_HERE>
WHERE alien_uid = <YOUR_ALIEN_UUID_HERE>
In this example:
UPDATE alien SET car_uid = '5f4b9b07-b9ed-4f01-82bb-48e015252fc3'
WHERE alien_uid = 'a91da577-5edd-40fa-8fca-a46babf1149e';

UPDATE alien SET car_uid = 'beaa3376-28fa-47c7-8a2c-36c1eae0ca92'
WHERE alien_uid = 'af4c04ec-789c-4657-aec3-4209ba6ba50f';
UUID as primary key example 3:
c137=# UPDATE alien SET car_uid = '5f4b9b07-b9ed-4f01-82bb-48e015252fc3'
WHERE alien_uid = 'a91da577-5edd-40fa-8fca-a46babf1149e';

UPDATE alien SET car_uid = 'beaa3376-28fa-47c7-8a2c-36c1eae0ca92'
WHERE alien_uid = 'af4c04ec-789c-4657-aec3-4209ba6ba50f';
UPDATE 1
UPDATE 1
Performing a FULL JOIN and selecting specific columns, as shown below, returns a table with aliens and their corresponding cars, but also cars without their assigned aliens:
SELECT first_name, last_name, gender, date_of_birth, email, species,
car.make AS car_make, car.model AS car_model, car.price AS car_price
FROM alien
FULL OUTER JOIN car
ON alien.car_uid = car.car_uid
ORDER BY alien.alien_uid;
UUID as primary key example 4:
c137=#
  SELECT first_name, last_name, gender, date_of_birth, email, species,
car.make AS car_make, car.model AS car_model, car.price AS car_price
FROM alien
FULL OUTER JOIN car
ON alien.car_uid = car.car_uid
ORDER BY alien.alien_uid;
 first_name | last_name | gender | date_of_birth |         email          | species | car_make | car_model | car_price
------------+-----------+--------+---------------+------------------------+---------+----------+-----------+-----------
 Noob       | Noob      | Male   | 2012-11-11    | [email protected] | ???     | Plumbuss | Future    | 104000.00
 John       | Doe       | Male   | 1978-05-09    | [email protected]         | Human   |          |           |
 Jessica    | Smith     | Female | 1999-12-02    | [email protected]       | Human   | Jotun    | Toaster   |  13500.00
            |           |        |               |                        |         | DMT      | Toaster   |  56500.00
(4 rows)
Conclusion
This guide is intended for junior developers or anyone who wants to learn more about interacting with PostgreSQL. I hope it will be useful!
Your take on the subject
They say knowledge has power only if you pass it on - we hope our blog post gave you valuable insight.
If you want to share your opinion or learn more about PostgreSQL, feel free to contact us. We'd love to hear what you have to say!